
Simplify Your Life &
Align with Your True North
Choose Your Path
-

Simplify
-

Introspect
-

Quotes
-

Inner-Voice
-

One-Person Business
-

Financial Freedom
124: Idaho = potatoes?
Whether or not you like potatoes, can we agree that Idaho sums up to more than that?
Maybe, maybe not. But why am I talking about Idaho today?
Whether or not you like potatoes, can we agree that Idaho sums up to more than that?
Maybe, maybe not. But why am I talking about Idaho today?
Well, it's because a few years ago, I got to witness Nathan Barry (founder of ConvertKit) have his Steve Jobs moment in Boise, Idaho. Imagine the scene. A room full of online entrepreneurs watching Nathan do a live demo of the email marketing platforms' newest feature - Visual Automations. As he clicked through an automated sequence of emails and trigger rules, the audience was releasing "oohs" and "aahs" like the famed Apple CEO Steve Jobs caused in his presentations.
Okay, enough nostalgia.
I am writing to you today to invite you to a brand new workshop I am doing where I show you how to use this email marketing platform to build your email list, send newsletters and to create automations based on actions of your readers. It's an in-depth live foundational workshop on ConvertKit which is designed for the perfect newbie as well as someone who has dabbled with it, yet wants a complete walkthrough from the beginning!
This is the workshop I wished I had access to back in 2016 when I became a user and then a ConvertKit Certified Expert. (Psst... That's how I got my start in online business before I pivoted to becoming a Squarespace web designer - as an email marketing expert and consultant.)
By the end of the workshop you will know how to add an opt-in form to your blog and website, how to send out an email to your email list and how to deliver a PDF using sequences and even how to create automation rules for creating an evergreen marketing system.
It's called ConvertKit Foundations Brunch Workshop and is happening online via Zoom on Saturday, Sept 3rd from 10 am to 1 pm EST (sorry, brunch is not provided!).
Early bird price is a mere $95 but the regular price kicks in at $295 next Wednesday, Aug 31st at 1 pm EST.
See all the juicy details of what the workshop consists of and enroll here.
To your email marketing + business success,
Sophia

120: A beautiful new way of scheduling clients with DotCal
I love being a web designer. I have a design business which allows me to help people with an online presence that they love and that helps them grow their business or spread their message.
I started my self-employed work in 2016 when I was focussing mainly on email marketing with ConvertKit. Then in 2018 that I began building websites professionally. At that time, I tried a lot of different things to get booked. And it was not easy. I had the skills and I knew I could do excellent work. But I didn’t know how to convey that to my potential clients.
Update: As of Jan 2024, DotCal is no more! Alas!
Today, I want to show you a beautiful new way for clients to book a meeting with you. It’s called DotCal.
The first step before a client hires me for a web design project is a 30 minute consultation call. We designers put so much time in creating a visually pleasing experience for our potential clients on our websites. But when it comes time to book a meeting, the experience drops aesthetically. Dotcal changes that.
As you can see Dotcal is a beautiful new way for booking clients. Watch the video below where I show you how I created a 30 min booking link which has my branding, my colors from my website. It’s friendly, approachable and simply lovely.
Click the image below to play video:

I love this app so much I have now partnered with DotCal as an affiliate so if you open an account using my link and discount code, you will get 50% off for the first six months. Plus, I will share with you a case study of how I did a 30 minute consult call with a potential client who went on to hire me for a web design project. I will also share a bonus video of me analyzing the call so you can learn what you can do in a consultation call to get hired for the design project. Email me with a screenshot of your new account you opened with my referral link and I will send you the case study and bonus material.
So go and try dotcal using my link: sophiaojha.com/dotcal and then use my code SophiaOjha50 to get 50% on your first six months. It’s starter plan is free. So try it out today!
Your Turn:
What are your main challenges with booking clients? What booking app do you use at the moment? Let me know in the comments.
Cheers to you and your abundant creativity,
🦄🦄🦄 Sophia
100: Turbo-Charge Your Email Marketing with Evergreen Lead Magnets
I am celebrating. 🎉 My article just got published on Honeybook's website!! And to celebrate, I am sharing an in-depth 45 minute video presentation in which I show you how to implement one of these lead magnets (a digital library) using ConvertKit.
It's called, Turbo-Charge Your Email Marketing with Evergreen Lead Magnets (Within An Afternoon)
Hello my Abundant Creative,
I am celebrating. 🎉 My article just got published on Honeybook's website!!
The article is called 7 Evergreen Lead Magnets to Grow Your Email List (link will bring you to the Honeybook/Rising Tide website). And to celebrate, I am sharing an in-depth 45 minute video presentation in which I show you how to implement one of these lead magnets (a digital library) using ConvertKit.
It's called, Turbo-Charge Your Email Marketing with Evergreen Lead Magnets (Within An Afternoon) and I cover:


You’ll learn:
1. why you should go evergreen with email list building?
2. seven types of evergreen lead magnets you can use (many of them without creating new content)
3. 10 examples of these lead magnets in action
4. how to figure out which one is right for your business (my four steps will help)
5. a live demo of me setting up a lead magnet on my website (I show you how l set up Lead Magnet example 5)
Sign up below for instant access:
Do you have a way to build your email list currently set up on your website? In other words, an opt-in form that folks can sign up and then receive a free gift (lead magnets) in return? If not, then I've got a juicy presentation where I show you how to do just that. If creating an opt-in on your website has been on your to-do list, watch this presentation and check it off today!
To your success,
Sophia
099: How to Add Social Media Icons to Default ConvertKit Templates
In today's video + blog, I am showing how you can customize the default email templates of ConvertKit using some code in the HTML block. Follow my step-by-step guide so you can format the template specifically to add custom branded social media icons and better serve your email marketing clients.
Hello my Abundant Creative,
In today's video + blog, I am showing how you can customize the default email templates of ConvertKit using some code in the HTML block. Follow my step-by-step guide so you can format the template specifically to add custom branded social media icons and better serve your email marketing clients.
See code below video.
Copy but Customize the Following Code
This code will not work if you do not customize the url source of the image (see bolded text) and if you don’t change up the link of your social media
Table to be added in the HTML block inside the CK default template:
<table>
<tr>
<td><a href="https://instagram.com/sophiaojha"> <img src="put the url of the image here" alt="Instagram" width="150" ></a></td>
<td><a href="https://www.youtube.com/sophiaojha"><img src="put the url of the image here" alt="YouTube" width="150" > </a></td>
</tr>
</table>
To your success,
Sophia

064: How to tweak the design of your Mailchimp opt-in form on your Squarespace website?
In this video and blog article, you will see how to make your opt-in form a little more pretty. Change colors of the form or make it completely transparent. You will do this all without any code. All you need is to follow the steps and play around with your settings under Design> Site Styles.
In the last video, you saw a demo of how to embed a Mailchimp opt-in form to collect emails on your Squarespace website. This is an important aspect of your website, so make sure you set up an email marketing system in your business.
Al’right, in this video, you will see how to make your opt-in form a little more pretty. Change colors of the form or make it completely transparent. You will do this all without any code. All you need is to follow the steps and play around with your settings under Design> Site Styles.
Watch the step-by-step video showing you how to do this yourself:
How to tweak the design of your Mailchimp Newsletter Opt-in Form
The video above goes into much greater details but here’s a quick step-by-step checklist for on how to tweak the design of your opt-in form.
|1 Go to Design > Site Styles
|2 Hover over the Newsletter on the right Content Area
|3 You will see the Newsletter Block options in the left panel
|4 Click on Background Color and change it to a color that matches/contrasts with your brand colors
|5 Next change the Alternate Background Color as well to have the same color as in Background Color
|6 Click on Button Color to change it
|7 Click on Alternate Button Color and change it there as well
|8 Under Button> Style Outline to choose Solid, Outline or Raised for the button style
|9 Under Button> Shape to choose Square, Rounded or Pill.
|10 Alternate look: Click on Background Color again and move the lowest circle to the left to make the box disappear or look transparent.
Learn How to Build Your Website on Squarespace:

Well, my friend, I hope you found this blog and tutorial useful. Let me know in the comments if you have questions on this or any other questions about email marketing or about building your website on Squarespace.
Are you getting excited to get your own website? I love designing websites for fabulous people like yourself, so take action to get your website design process started —> Start the Conversation by sharing some ideas about your site with me.
Questions about this blog post? You can drop them in the comments below!
~Peace,
Sophia

063: How to embed an Mailchimp opt-in form on your Squarespace website?
To make the most of your website, it is important to collect emails and build your list. This not only allows you to continue the conversation with your site visitors who now become your email list members, but also enables you to build trust and continue to offer your services, offers, products and other free and useful content such as videos, workshops and live trainings. In this video + blog article, I show you just how to do that.
To make the most of your website, it is important to collect emails and build your list. This not only allows you to continue the conversation with your site visitors who now become your email list members, but also enables you to build trust and continue to offer your services, offers, products and other free and useful content such as videos, workshops and live trainings.
But if you do not have an opt-in form embedded on your site, you cannot collect emails of your site visitors who are interested in hearing more from you. Today, I show you how you can embed an email opt-in form using Mailchimp, a useful email marketing platform free upt o 2000 subscribers. Note that you do have to open an account with Mailchimp and set up your list/audience settings first before doing this step on your website.
Other email marketing platforms that are good alternatives to Mailchimp are ConvertKit and MailerLite. (Affiliate Links). I have used all three and found each platform appropriate for very different needs. If you are a new blogger or online entrepreneur or an artist just building your email list, go with Mailchimp or MailerLite which both have free entry points upto a certain number of subscribers. If you are at an advanced stage or plan to immediately implement complex workflows and email sequences, then ConvertKit and MailerLite are better options.
So now here’s how you can connect the opt-in from on your Squarespace website.
Note: You can customize the design of the Newsletter form under Design > Site Styles. This video and checklist in blog post 64 hows you how to do that.
Watch the step-by-step video showing you how to do this yourself:
How to Embed a Mailchimp opt-in form on your Squarespace Website?
Watch the video above to see all the details but here’s a quick step-by-step checklist for embedding a Mailchimp Form.
|1 Create a New Page by Clicking +
|2 Select Blank and Name it
|3 Click the Wheel Icon
|4 Go to Media
|5 Upload Image and Click Save
|6 Click on Edit
|7 Click on the Sideways Teardrop Icon
|8 Look for Newsletter Block under More
|9 Give the Form a Name
|10 Customize Title and Description and Alignment
|11 Click Storage
|12 Click “Connect other services” link
|13 Mailchimp opens up. Click on it and Connect with Mailchimp
|14 Select the correct list/audience in the drop-down menu
|15 Click “Require double opt-in after subscribing”
|16 Under Advance customize Submit Button Label and Post-Submit Message
|17 Click on Apply. Click Save.
|18 That’s it.
Note: You can customize the design of the Newsletter form under Design > Site Styles. This video and checklist in blog post 64 hows you how to do that.
Learn How to Build Your Website on Squarespace:

Well, my friend, I hope you found this blog and tutorial useful. Let me know in the comments if you have questions on this or any other questions about email marketing or about building your website on Squarespace.
Are you getting excited to get your own website? I love designing websites for fabulous people like yourself, so take action to get your website design process started —> Start the Conversation by sharing some ideas about your site with me.
Questions about this blog post? You can drop them in the comments below!
~Peace,
Sophia
Turbo-Charge Your Email Marketing with Evergreen Lead Magnets (within an afternoon)
Get Instant Access | 45 Min Video Training with ConvertKit Walkthrough
In this presentation, I walk you through 7 different evergreen lead magnets/freebies that you can set up on your website to grow your email list. I also give you 10 real life examples of lead magnets from various online entrepreneurs and show you how to set up an opt-in using ConvertKit + Squarespace. Get instant access to view this training by clicking the button below and signing up.

044: How I am using the One Metric That Matters Framework for better results in my business.
See how you can use the One Metric That Matters Framework for creating better results in your business. I also share the One Metric Tool Kit for you with step-by-step guide, tracking spreadsheet and a video walkthrough.
What if all you need to focus on your business is - The One Metric That Matters?
What if focussing full force on just one thing would be what changes everything in your business.
Think about it:
How would this approach change things for you? How would it impact the way you invest your time and money in your business? How would it affect you as a business person?
Well, I've just decided on my One Metric That Matters and it has changed everything. It has impacted how I plan my day, what I invest my time in and how I feel about my business. I don't have any results to report that are tangible yet since I've just begun this last week.
But what I can report on is that I feel more focused and clear about my activities during the day and at the end of the day I go to bed feeling accomplished and content with my efforts.
This is a big change from working all hours of the day and night and still not feeling a sense of completion. The to-do list of a solopreneur are never-ending. Can you relate?
So this is what I invite you to do:
Don't let this blog post be yet another that you skim through or read over and forget about it in a few weeks.
Do let this blog article be the source of a pivotal moment in your business when you decide on your One Metric That Matters.
I did just that with an article I read last week. It was a phenomenally inspiring article by Garrett Moon, the CEO of CoSchedule, a SaaS company. He wrote about about how he grew his company to $5MM using the 1MTM Framework and I decided that the time I invested in reading his article will result in a practical action-plan that I put into place by that weekend.
In this blog post and video, I am sharing exactly what that action-plan turned out to be and what my 1MTM is as a result. You will also learn a lot about my goals and focus in the current stage of my business.
And if all of this does what it's meant to, then you will be inspired to clarify your 1MTM One Metric That Matters and move towards better results in your business.
Are you in?
Let's begin:
Watch the video to see me walk you through all the steps:

What is the 1MTM Framework?
Before I go any deeper, let's quickly review what 1MTM is. The 1MTM or The One Metric That Matters is something that is detailed in the book, Lean Analytics: Use Data to Build a Better Startup Faster by Alistair Croll and Benjamin Yoskovitz.
The essence of the 1MTM is that you focus on just one thing and measure just one thing in your business and all your efforts in your business should be focused on that one thing.
“The One Metric That Matters is all about finding the right thing to track at the right time, based on the type of business you’re in and the stage you’re at... In the literal sense, you should really only focus on one key metric at any given time. That metric will change over time, and you may only focus on it for a short period of time, but try and stick to one. You may have a number of metrics that bubble into the One Metric That Matters.”
I was completely intrigued by this article - not because the idea of focussing on one thing was new. I've read the The ONE Thing by Gary Keller and because of my leanings to a minimalist lifestyle, I resonate with the idea of 'less is more'.
But here I found an article of a real business that actually put the idea into practice and yielded tremendous success. Clearly, the idea is powerful not just in theory but most importantly, in practice, and here's a business that proves it.
So what was CoSchedule's 1MTM?
Get Traffic that leads to Email signups.
Now it's not surprising that an SaaS company would focus on traffic + email signups. As an email marketing consultant, it's über-obvious to me because email lists lead to more conversions than any other marketing method.
As Garrett puts it, "...your emails enjoy about 350% more visibility than organic social messages. And that’s just on a bad hair day."
I was so impressed by this article that I decided that I will not just read it and move on to the next to-do on my list. I wanted to bring that understanding and apply it to my own business.
So I wrote this comment to Garrett's article and committed to an action-plan as a result:
Here' a better look at my action-plan:
1. Set aside an hour this weekend to identify what is the 1MTM in my business. ✔︎ Done
2. Create a spreadsheet to track that metric starting now. ✔︎ Done
3. Consider the advice of creating one less weekly video/blog and creating a content upgrade instead. ✔︎ Done - already created one new CU
4. Identify which video is most viewed on my YouTube channel and which article is most read on my site. Create a content upgrade to serve that question for my audience. Scheduled
5. Then create more content that would support the most wanted content on my platforms (website blog + YouTube). Scheduled
6. Read Garrett's article again in a month (on July 14th) to see what else I can learn from it. Scheduled
The 1MTM for CoSchedule was to build Traffic and drive conversion to their email list. Now in the back of my mind, building an email list has always been important. But to be honest, in the whole rush of serving my clients and making a living, I confess that I've neglected the list-building part of my business.
On top of that, I implement email marketing systems for my clients - so it's a bit ironic that it was not front and center in my own focus. Instead, what I've been focussing on is getting new clients, retaining old clients and then working on the projects for implementing their systems.
As a solopreneur doing all things in the business all the time, building an email list came as an afterthought. Can you relate?
But I didn't want to just jump at 'build my email list' as my 1MTM just because that's what everyone said. I didn't want to just pick my 1MTM willy nilly without putting in some thought and making sure it actually was aligned with what I want to create and achieve in my business.
So how was I to figure out my 1MTM?
As I promised in my comments, I set aside some time that weekend and came up with some good results.
Beach chairs on the front porch, a sunny Saturday afternoon and delightful sandwiches were in order!
That's the way I went about it, at least. Colorful IKEA beach chairs are key! And yes, a business-minded partner to Hedgehog with, in this case, my husband. 'Hedgehogging' is something I learnt from the author Jim Collins of Great by Choice, which for me is a focused session to review my business at the executive level - from big picture down to nitty-gritty.
Well, I'd like to share with you my process that I went through that weekend after I read Garrett's article:
1. What are the current activities in the business? What are you already tracking?
I started off by listing the kinds of activities that I was already doing in my business and some metrics that I would assess from time to time. If you are a solopreneur wearing those 100 million hats, I think you might relate.
Some metrics that a solopreneur offering a service would consider are:
Revenue
No of Client inquires via contact form or email
Traffic
Page views
Time spent on the site
No of YouTube Followers
No of Facebook Likes
No of old clients
No of new client inquiries
Writing proposals to prospective clients
Writing blog articles
Publishing YouTube video tutorials
Hosting Live free events/webinars
Hosting Live paid workshops
No. of paid workshop participants
No of emails sent out
No of email subscribers
... and so on.
Then we discussed what One Thing I could do on a consistent basis that would make everything else easier? This question is inspired by Gary Keller's book, The One Thing.
To answer that though, I had to dig deeper into what is the goal of my business right now and what am I working towards down the road - say in a few years.
2. What is the goal of the business?
The goal that I have currently in my business is to build it to create leveraged income in a couple of years. I would like to create online programs/e-courses that will help solve specific problems of my audience. I also want to work one-to-one with solopreneurs and online businesses to create their websites that convert. And I want to teach live workshops on the same topic both online and in-person around North Carolina and New Jersey/New York area and may be even Germany and the UK and other places in a few years.
3. What is currently on offer? Or what are you working to build?
These are the services and workshops that I currently have on offer are or am working to build:
1. content marketing strategy services
2. email marketing strategy services
3. web design service to create a Squarspace website with content marketing and email marketing in place from the start
4. teaching live workshops on how to create high-converting websites using email marketing and website that are optimized for conversions
5. working on online courses
6. working on digital downloads such as worksheets, action plans, workshops and books.
4. What is important for your current stage in business? And what do you see important for the future stage of your business?
So what is common in both my current stage and the future stage of my business is visibility. I've got to have an audience who likes, trusts and knows me in order to take the next step with me. This is something that happens long-term over time. That's why an email nurturing system is critical.
Now, we know that the number of products or services sold is connected with the number of subscribers one has. The higher the number of subscribers the more products and services will sell. It really is a numbers game.
So clearly building my list is a key metric.
My email list size is my 1MTM
But knowing this 1MTM leads to the next question:
How will I build my email list?
Should I be tracking my page views?
Should I be spending my time learning every metric in my Google Analytics account?
The way I came up with the next bit of insight was this. All those page view related metrics or my email list number were not going to change by me just tracking it each week or each month.
I realized I've got to put into place a system that will influence incoming traffic.
Now I've got to options:
Long-haul efforts via organic traffic over time
or
Quick spike in my email list with Ads in short period of time
At this phase in my business, I know that Ads are out.
Why?
Because:
1. I have yet not played around with Ads.
2. I don't want to invest time in learning about ads just yet while I am still building other parts of my business and serving my clients.
3. I don't want to invest the money in another expert or consultant while I am still working to get my revenue up AND building other parts of my business.
4. There's a lot of trial and error involved with Ads which calls for time and money that I'd rather invest in building other areas of my business and serving my current and new clients.
So, for now, ads are out.
I am actually relieved that I will be focussing on organic growth. I've seen and heard about countless entrepreneurs building their business on organic traffic. I will eventually enter those waters where I consider investing in ads but I know that now is not the time and I am fine with it.
What remains then is: organic traffic.
So now there are still many things that I can track and measure. But I want to focus on what actions I can take in order to grow the traffic. I want to track things that I can control and influence.
These are the three variable inputs that I can control and influence:
1. No. of blog posts I publish each week
2. No. of YouTube videos I publish
3. No. of Content Upgrades or Lead Magnets that I have on offer
Sidenote: I've already determined in a previous Hedgehog session that my core means of creating content is a combination of blog articles and video tutorials. So that rules out all the other types of content that you, for instance, may choose from.
Why Blog Posts?
To build credibility and solve problems
I need blog posts because they are highly valuable tool to demonstrate my expertise on a topic and more importantly, to solve a particular problem of my ideal client. See my blog post 043 on that topic where I share more about the importance of blogs and content on your site. However, I need to help my site to get found. That's where YouTube videos come in.
Why YouTube Videos?
To solve problems and get found on Google searches
Next, I need to create YouTube videos because YouTube serves as a search engine more than a social media platform. Videos are beloved by Google Search and my audience is looking for answers on YouTube. It is essential that I have a presence there in order to reach out to those who are looking for solutions that I can offer. See my YouTube channel here:
Why Content Upgrades?
To help retain traffic and convert visitors into subscribers
And finally, I decided to have content upgrades and lead magnets because these are what people like to opt-into. They go deeper into the blog topic and offer more support to your reader in solving whatever question your blog attempts at solving. In essence, give them even more value.
These three variable inputs all falls into step 2 that I wrote about in blog 043 which is all about content creation and conversion.
So as you can see even though the 1MTM is my email list, I will be focussing my time and energy on creating blog articles, YouTube videos and new content upgrades + lead magnets. And this is something I will track monthly.
I will come back next month and add any insights from my second reading of Garrett's article. Until then, I invite you to craft your own One Metric That Matters.
Share with me in the comments your 1MTM and how you came to choose it in 4-5 sentences or less.
Peace,
Sophia
Related Videos:


041: How to Craft A Re-engagement Email to Keep Your List Fresh
From time to time, every online entrepreneur must look at their list of subscribers and make it as up-to-date as possible. Making sure you are sending emails to a group of engaged people is key to a successful email marketing strategy. There are many ways to do it and in the coming weeks I will share with you a content marketing angle for sending re-engagement campaigns.
Hello there!
From time to time, every online entrepreneur must look at their list of subscribers and make it as up-to-date as possible. Making sure you are sending emails to a group of engaged people is key to a successful email marketing strategy. There are many ways to do it and in the coming weeks I will share with you a content marketing angle for sending re-engagement campaigns.
But today, I want to show you how I dealt with the new EU GDPR (data protection) law. One of the things I needed to do was to get a fresh consent from my existing subscribers, asking them if they wanted to continue staying on my list. I am sharing with you the exact email and then a breakdown of that email so you can use this formula for other types of re-engagement emails.
Watch the video to see me walk you through all the steps:

The Exact Email I Sent
Below is the exact email that I sent to my list a few days before the May 25th, the date GDPR came into effect. The subject line that I used was:
Email Subject Line: [Action Needed] Do you want to still hear from me?
Of course, you can change that email subject line and make it more in line with your style of writing. All of this is just an example, an idea for you. It's by no means legal advice on how to send GDPR-compliant emails. But this will give you a formula for crafting the text, at least, so that you can have a good starting point.

The Email Breakdown
The way I crafted the email was to use each section with a specific goal in mind. Remember, I wanted to refresh the memory of my subscriber on who I am and what I do. So adding different ways to do that; using photos and links, was quite important. We need to help our readers who are often so busy and are inundated with so much information in their inbox.
So take a look at the breakdown of my email:
1. Here you can see that I added an email banner that has my photo. It's the photo associated with my brand. It really helps the reader to have a visual reminder of who you are. So consider adding a photo in your email banner. It's a wonderful way to be remembered. Names can be forgotten, but faces are remembered.
2. Add a subject line that's to the point. Before you write the body of the email, start off with a bolded subject line which goes straight-to-the-point of the matter, telling them why you are writing. In this case, I wrote, "I want to make sure you want my emails".
3. In the body of the email, highlight the main reason you are writing. In this case, asking them to click the green button if they want to continue hearing from me. And I made that part highlighted in yellow (use your brand colors) so that they could quickly see why I was writing them.
4. Share why you need to do this. I informed them that this was part of me keeping in line with the new EU GDPR laws. Your reason may be something like, "I want to be sure that my emails are adding value to my subscribers" or something in those lines.
5. Next recap what kind of content you will be sending them. This is important because the subscriber will know, "okay, she writes about content marketing as well as email marketing and I will get some tips on optimizing my website". You want them to know also the frequency of your mails as well and what type of media they can expect, for instance whether you will send them PDF checklists, blog articles, podcasts, video tutorials, etc.
6. Clearly ask for the subscriber to re-consent. You can see here that I state, "Please reconfirm your agreement by clicking the green button". Plus, I highlighted the text by putting the font color to stand out in yellow.
7. Next expressly state what happens if they don't click. This is important so the reader knows what is the consequence if they don't click the green button. In my case, I would not be sending them any more emails, which is key to point out clearly. In other re-engagement campaigns, you may not state this until it is the final email that you are sending after which you will most definitely be removing the subscriber from your list.
8. In your signature, link your website. Too often I receive emails without a link to the website where I signed up for their email. I simply want to go their website, refresh my memory of who this person is so that I can decide whether I really want to be on their list. If there's no easy way to do this, subscribers may simply hit delete and not want to even Google you. So put a link to your website in the signature and make it easy for them.
9. Here, there are two buttons. A green one to stay on the list and a black one to unsubscribe. This was recommended by MailerLite and I chose to go with it. You, on the other hand, may like to have two buttons like this as it makes the choice very clear or you may have a single link stating: "Click here to remain on the list".
10. Remind the reader of who you are, again, in the footer. You may not have to do this in all your "regular" emails. But because the goal here is to remind the reader of who you are and what value you bring to them, a short description in 2-3 sentences is a good idea.
11. Add your website link at the very bottom of the footer, again. This is yet another opportunity to give you reader the chance to look you up before they make their decision.
So those are the 11-steps I took to craft my re-consent or re-engagement email that I sent to my list. Once they clicked subscribe, I sent out another email with a "Thank You" and sent them an update on what's new.
My colleague and friend, Marta Raptis, a Squarespace Website Designer sent out a re-consent email as well. And after that she sent a wonderful email thanking everyone for staying on her list which I think is a wonderful way to express gratitude to one's subscribers, treating them like real people. Plus, she included a round-up of some of her blog posts that would come in handy for her reader. I simply love it so I asked her if I could share this email with you. Take a look at her thank you email:
Posted here with permission from its author, Marta Raptis of www.martaraptis.com
So that's it my friends. I hope that these 11 steps for crafting your re-engagement email is helpful and that you are inspired by the thank you email from my colleague Marta Raptis.
Happy crafting your emails!
As always, share your questions in the comments. Let me know what you think and if you have other video/blog tutorial topics for me.
Before we wrap up, I'd like to invite you to a live workshop that I am holding at the end of this month. It's called, "Create a Website that Converts". If you are in the process of creating a website on Squarspace that not only looks beautifully designed, but also helps you grow your list, build your credibility, and get you clients as well as sell your products and services, then this workshop is for you. I'd love for you to join me so take a look at the details on this page here.
Thank you,
Sophia
Related Videos:


040: How to Connect Leadbox with Your ConvertKit Form that has a Checkbox
So you want your Leadpages/Leadbox opt-in box set-up in such a way that when someone clicks on it, a form pops up that has a checkbox AND it feeds into a tag inside ConvertKit? Then this video + blog post show you how to do that.
Hello there!
So you want your Leadpages/Leadbox opt-in box set-up in such a way that when someone clicks on it, a form pops up that has a checkbox AND it feeds into a tag inside ConvertKit? Then this video + blog post show you how to do that.
Something that looks like this:
Watch the video to see me walk you through all the steps

Step 1: Open up the form in ConvertKit that you want connected to your Leadbox. Or Create a new form.
Note: When you integrate a third party app like Leadbox/Leadpages with ConvertKit you will most likely need to connect it with a ConvertKit Form/Tag/Sequence. In this case, we will be using a form. What this means is that when someone subscribes by clicking your Leadbox, the information is then fed into ConvertKit. (You will need to make sure that your Leadpages account is connected with ConvertKit using API - this step is not shown in the video).
Step 2: (Optional but recommended) Customize the form to fit the Leadbox pop-up style. You will go into ConvertKit Form -> Style -> Custom CSS
Copy the code below:
.ck_powered_by { display: none !important; }
.ck_form {box-shadow: none; }
.ck_form {
border-top: none;
border-bottom: none; }
.ck_form { background: #fff; border: none !important; }
.ck_form_content, .ck_form_fields { padding: 1%; }
.ck_form_content h3 { text-align: center; }
.ck_form_content, .ck_form_fields { float: none; width: 100%; }
You don't have to do this styling. But it helps to add this code so that when the Leadbox is clicked it pops open a form that fits the sleek sytle of a leadbox. This (step 2) is completely optional but I highly recommend it.
Step 3: In Leadpages Account, create your leadbox or open up an existing one. Style the form the way you want it.
Step 4: While still working with the Leadbox, replace the form that's there with HTML block. Delete the Opt-in Form section that was in-built there.
Step 5: Jump into your ConvertKit Form. Click on Embed -> then Raw HTML. Copy the entire Raw HTML. You will be pasting this code into the Leadbox but before that open up a text editor.
Step 6. In a text editor, like Pages on the Mac or Word on a PC, paste the entire Raw HTML code. This is because it is easier to work with the Raw HTML code when you can see it better in a text editor. You will copy it all in the end and bring it into Leadbox eventually.
Step 7. Look for the section that starts with <button class. Right above it, paste the code for a checkbox.
Here's that code:
<!-- Begin Checkboxes -->
      <div class="ck_control_group">
        <label style="display: block; margin-top: 10px">
          <input type="checkbox" name="tags[]" value="444444" /> Yes, send me your weekly newsletter.
        </label>
      </div>
      <!-- End Checkboxes -->
Step 8. Make sure to update the tag value. This is very important. The way to do it is to click on the tag inside ConvertKit that you want the checkbox data to go to. Then look in the URL for the tag value. See steps 2 and 3 in Blog Video 039 that shows you how to do this visually.
Step 9. Now copy all of this Raw HTML code including the checkbox code
Step 10. Now paste it into your Leadbox. Specifically into the HTML code box. (Click the pencil icon to edit).
Step 11. Click save. Then click Publish. Click the Button Link. Stylize it. Click Get Code and then copy it.
Step 12. Jump into your Squarespace website or wherever you want the Leadbox to show up. Add a Code block. Then paste the code you grabbed from your Leadbox. Click save. Refresh the page. And test the form by adding in your info and checking your ConvertKit account to see that it is working.
That's it. You are done! Watch the video I've created as it may be easier to understand what I mean when I demonstrate the steps visually. Let me know in the comments if there's something unclear and I will help you out!
Thank you for watching. Also, I'd love to know what other questions you have so I can answer them in my next tutorials.
Thanks, Sophia
Related Videos:


039: How to Add a Checkbox to your ConvertKit Opt-in Form?
In this blog, I show you the steps for setting up checkboxes in a ConvertKit form which then adds the info collected into a tag.
Hello there,
ConvertKit forms collect names and emails. But you can also have checkboxes giving people a chance to choose something specific. Or you can use checkboxes to give your subscriber the option to opt-into your newsletter and/or marketing emails and offers. And then that info feeds into a tag inside your ConvertKit account
The EU regulation, the General Data Protection Regulation (GDPR) goes into effect on Friday May 25th, 2018. I won't got into all of the regulation requirements because I am not legally qualified but I can show you technically how to do some of the things towards becoming compliant. One of the things that online entrepreneurs are putting into place is a way to get consent from new subscribers right on their opt-in forms.
If you are using ConvertKit, then this video is right for you. I will show you how to enable one or more checkboxes on your form. And then also how to tag those who select the check-box.
Note: To get GDPR compliant, make sure to get your own legal advice based on the needs of your business and the location of your business.
Task:
adding checkboxes to a ConvertKit Form, feed that info into a tag
Purpose/Use Cases:
+ to give subscriber a choice for opting-in to a newsletter or marketing offers.
+ make opt-in forms GDPR compliant (EU law effective May 25, 2018).
+ to give subscriber choice of other supplementary content like additional Free PDFs.
+ to tag subscriber based on preferences (give them checkboxes to self-select tags). [Thanks Jason Troyer for your question in the comments].
Code needed:
Yes
Related Videos:
Blog 040: How to Add Checkbox to a ConvertKit form that is integrated with Lead Pages
Blog 041: My exact email for refreshing consent from my existing subscribers for the GDPR EU law.
Scroll to the bottom of the blog to see Video Tutorial!
There's a video showing you the steps below. But here is quick summary of what you've got to do:
Note: You will need to use the Raw HTML to embed your ConvertKit form to your website or if you are using Leadpages, then into Leadpages. This is because of the customization that we need to do in order to make checkboxes happen in ConvertKit forms.
Summary of Steps
1. Decide how many checkboxes you want and what the text will be.
2. For each checkbox, create a corresponding tag. So for example, if the first checkbox says "Yes, I want your newsletter", then have a tag that says "Consent - Newsletter".
3. Click on each tag and note down the tag id that shows up in the url. (see video)
4. Create a new form or open an existing form on which you want the check-box. Style it like you want it just like a regular form. Hit Save ALWAYS after making a change.
5. Go into Embed tab, and grab the Raw HTML.
6. Then go to your website, where you want this form to appear. In Squarespace, you will use the code block to paste this Raw HTML code.
7. Next, in the Raw HTML, look for the section that starts with <button class =
8. Right above it, paste the following code but look at step 9 and 10 for customizing:
<!-- Begin Checkboxes -->
      <div class="ck_control_group">
        <label style="display: block; margin-top: 10px">
          <input type="checkbox" name="tags[]" value="444444" /> Yes, send me your weekly newsletter.
        </label>
      </div>
      <!-- End Checkboxes -->
9. Where it says, value= "444444", repalce the "444444" with the tag id that corresponds to the first checkbox.
10. Adjust the text, "Yes, send me your weekly email newsletter." to fit what you want the checkbox to contain.
11. Save and test.
Bonus steps if you want to add another checkbox:
12. To add another checkbox, duplicate part of the code from above and customize it using step 9 and 10.
<label style="display: block; margin-top: 10px">
<input type="checkbox" name="tags[]" value="444445" /> Yes, send me emails about your online program and other marketing offers.
</label>
13. So the entire code for having two checkboxes will look like this:
<!-- Begin Checkboxes -->
      <div class="ck_control_group">
        <label style="display: block; margin-top: 10px">
          <input type="checkbox" name="tags[]" value="444444" /> Yes, send me your weekly newsletter.
        </label>
        <label style="display: block; margin-top: 10px">
          <input type="checkbox" name="tags[]" value="444444" /> Yes, send me your emails about your online program.
        </label>
      </div>
      <!-- End Checkboxes -->
14. Save and test.
Watch Steps 1 - 11 in this Video
If you want to integrate your ConvertKit forms with Leadpages and have checkboxes, then look for my other blog post that I will be publishing on this very topic. (Until then, just follow the above steps and paste all the code into the HTML block inside Leadpages. Make sure to test it).
So that's it. I hope this is useful. Share your comments + questions below.
Related Videos:


038: How to link an image to a ConvertKit modal pop-up form in Squarespace?
Here's a video showing you just how to do that. Linking an image to a ConvertKit pop-up modal form. I've yet to experiment with how it is to have multiple images on the same page linked to different pop-ups. Until I play around with that, here's the video that shows you how to link one image to a form.
Also, if you want multiple forms to pop-up from buttons, here's the blog post with video tutorial on that:
024: How to Create Multiple ConvertKit Forms on My Squarespace Page?
Okay, now the video tutorial: (Copy code on the bottom of the video)
Here's the bit of code you'll need:
<a href="#ck_modal" rel="ck_modal"><img src="grab the image url from the browser by right clicking on the image"/></a>
Do share with me a link of where and how you incorporated this. I'd love to know.
Peace,
Sophia
037: How to remove the dotted line from your links in your ConvertKit emails?
Hello there!
This video is in answer to Janine's question. She asked how to remove the double lines that appeared in her emails under the link text. So here's a quick video showing you how to remove the lines.
In brief though, this is what you need to do:
1. Go to your custom template.
2. Look for the code addressing all links. It will look something like this:
a {
text-decoration: underline;
border-bottom: 1px dotted #0875c1;
color: #59c4d9;
}
3. Next, remove the bit about dotted and underline so that the adjusted code looks like this:
a {
text-decoration: none;
border-bottom: none;
color: #59c4d9;
}
And now a quick video to show you the above steps visually:
035: Customize Your ConvertKit Email Template With these 5 Videos
If you'd like to customize your ConvertKit Emails to match your brand, this blog is for you. Below I've listed five most asked for videos/tutorials when it comes to customizing the look of emails inside ConvertKit.
Take a look at the following blog posts that have step-by-step directions with screenshots, code for copying into your template as well as complete video walkthroughs.
If you'd like to customize your ConvertKit Emails to match your brand, this blog is for you. Below I've listed five most asked for videos/tutorials when it comes to customizing the look of emails inside ConvertKit.
Take a look at the following blog posts that have step-by-step directions with screenshots, code for copying into your template as well as complete video walkthroughs:
1. How to add a banner image to your emails: https://www.sophiaojha.com/blog/005-adding-banner-to-convertkit-emails
2. How to changing the color of the unsubscribe link: https://www.sophiaojha.com/blog/016-how-to-change-unsubscribe-link-color-in-convertkit
3. How to change "unsubscribe" into German or other languages: https://www.sophiaojha.com/blog/018-change-unsubscribe-into-german-or-other-languages
4. How to change the link colors that are in the body of your emails: https://www.sophiaojha.com/blog/003-changing-link-color-on-convertkit
5. How to add social media icons: https://www.sophiaojha.com/blog/002-social-media-links-convertkit-email-template
I hope this helps. If you'd rather have a template created by me, then you can hire me for an hour on my new Services page to get started.
Peace,
Sophia
034: My No. 1 Tip For Writing Email Subject Lines: Give Value
There are tons of ways to write the subject line of an email. And you can experiment to find out just the right way that suits your style. But whether you write long emails or short ones, follow this zen approach to writing subject lines which help to make your email opened, clicked and most importantly valued by your reader.
In every action I take in my business, I ask myself: how can what I am doing right now be of use to my reader. And if you start at this place too, I am confident that whatever you produce will reach the goal you set for it.
So when it comes to writing subject lines for my emails, here's my no. 1 tip...
There are tons of ways to write the subject line of an email. And you can experiment to find out just the right way that suits your style. But whether you write long emails or short ones, follow this zen approach to writing subject lines which help to make your email opened, clicked and most importantly valued by your reader.
In every action I take in my business, I ask myself: how can what I am doing right now be of use to my reader. And if you start at this place too, I am confident that whatever you produce will reach the goal you set for it.
So when it comes to writing subject lines for my emails, here's my no. 1 tip:
Write Subject Lines That Give Value
Write subject lines that give value and you will truly be adding value to your reader not just fooling them to open your emails.
How many times do you see subject lines that are only designed to make you open the email? Nothing wrong with that except when it feels icky and manipulative or plain irrelevant to the email subject matter.
I've seen subject lines that go like:
"I have a confession"
"I made a mistake"
"Squirrel"
These subject lines may make you open the email, but the content inside may seem like a waste of time.
An Email Is A Letter to Someone
An email is literally a letter. It is a letter to a person to whom you want to communicate a message with. It is not simply a digital tactic sent out to a number on your list. It is an actual message read by a real person with real life problems, dreams and struggles. And it is an opportunity to serve, to help, to assist, to use your skills and talents for the benefit of another. In fact, I believe a single email can change a life! Yes, I know. How idealistic, but it sure can!
So why not treat an email like the golden opportunity that it really is - an opportunity to connect with another human being, to build something wonderful, to solve real-life problems and to serve meaningfully?
Examples of Recent Subject Lines I've Used
To give you an idea of the type of subject lines I use, here is a sample of some recent subject lines that have gone out to the lovely people on my list.
1. Brainstorm next month's email topics in an afternoon
2. My complete 8 step email content creation process - for you!
3. [Video] How to set up an evergreen sales funnel using visual automations
4. Why emailing your list the latest blog post doesn't always work
5. [Invitation] Up your ConvertKit confidence with ConvertKit Foundations Brunch Workshop
6. How often you should email your list?
Each subject line was meant to deliver value even if the reader never opened up and read the full email. In other words, the email subject line should really communicate value to your reader.
The way I look at it is this: Of course, I want my reader to open up the email. And I want to tell them what's inside the email. But if for whatever reason, they cannot open up the email, but can only read the subject line, I want it to still be valuable enough so they can benefit from it.
I want the subject line to be a way for the reader to be able to decide whether or not he/she should invest time in opening that email.
For instance look at subject line No. 5. They can instantly see it is an invitation to a workshop and what the workshop is about. If that's of interest, they will click. Otherwise, they can move on and focus on what's essential for them. This alone is of value. The value is time-saved. The last thing I want to do is to waste someone's time with my emails. That's bad karma! Yes, I do believe in good and bad karma and the golden rule! :)
So when you sit down to write your email subject lines, be helpful to your reader, just like you do when writing the email content. Treat them as a friend who needs and wants your help.
What would you write in an urgent situation?
Let's take this scenario here: What if the subject line of an email is your only chance to send somebody a message in an urgent situation?
Let me elaborate:
Imagine that your loved one is on his or her way to catching a flight. And you just had an argument before they left and you didn’t get up the courage to say something important. But you don't want them to leave like that - without a resolution to the argument.
And now you urgently want them to know that you love them and care for them and you also want to send them an apology. But you know that their phone will soon be out of power and on top of that soon they will have to turn it off anyways before the plane takes off. (Drama: real Bollywood style). You know that even if you your beloved could just see the subject line it could resolve the whole situation.
Of course, you would try to follow them to the airport or at least call or send them a text as well - but just for my example we are emailing ;-)
So now what would you email them?
Would you rather email them a subject line:
"Open up to see inside an important message that you won't wanna miss".
Or would you rather write:
"I love you".
I think we both know the answer!
Being Real Instead of Using Marketing Tricks
It really is important to keep our humanity and be real when writing emails to the people on our list. I think that is much more powerful and leaves a positive impact on your readers’ mind and maybe even their hearts.
It’s far too easy to fall for all the marketing advice out there that talks about writing email copy that converts using all the tips and tricks in the marketing toolbox. But I think, it is time to change that. I know my approach is different than what you may read on most popular blogs and I hope you agree that we need to take this more human approach.
Don't we all want to deal with human beings who treat us like a person not just as a potential customer who will buy something from them some day? Plus, we are all quite savvy nowadays and can easily sense who is trying to be a sales person and who is really trying to serve us with value.
How To Be More Human In Your Subject Lines?
I think the first thing really is to realize that it is okay to be yourself. No scratch that. It is in fact, essential that you are yourself. Your emails should represent who you are and what your business values and stands for. When you do this, you are able to give yourself permission to not have to use marketing tricks that don't feel authentic to you. And that’s also when you attract an audience that is in alignment with your business.
So here’s my quick mini-guideline to help you when you are crafting your subject line:
First. Write out your email with the message/value you want to convey to your reader.
Second. Think what is the gist or the summary of this message in a sentence or two.
Third. Tweak that sentence so it is down to a short sentence or even a phrase.
Finally. Ask yourself how can this subject line offer value/benefit to my reader? Would I write this if this is all my reader ever saw about this topic?
I hope that this helps you think about how you can add value to the people reading your emails even just with a single email subject line.
Do write to me in the comments below which subject lines you came up with. I'd love to see those. You can also share any that stand out in your inbox that you found useful. Plus, what do you think of this approach I am sharing in this post about using subject lines to offer value to your readers?
Thanks for reading! Keep writing!
Sophia

033: How to Come Up With Email Topics (Free Worksheet)
Brainstorming is a key step in email content creation process. It helps you to get your ideas down on paper, sort through them, select the best ones and throw out the rest or keep them for a future time.
The goal here is to come up with a bunch of ideas without censoring yourself or editing yourself while you are brainstorming. Let's dive a bit deeper and come up with the email topics for an entire month.
In blog post 032, I shared with you my complete 8 Step Email Content Creating Process, specifically for planning, creating and scheduling your emails at least a month in advance of when they are to go out to your audience.
Today, I want to dive a bit deeper into Step 2: Begin Planning Process - Brainstorm.
Brainstorming is a key step in the process. It helps you to get your ideas down on paper, sort through them, select the best ones and throw out the rest or keep them for a future time.
The goal here is to come up with a bunch of ideas without censoring yourself or editing yourself while you are brainstorming. At the end of the process, you will shortlist the exact email topics based on how often you email your list each month. It could be 4 or 5 topics if you email weekly, but you will adjust according to your emailing schedule for each month.
Remember to follow my zen approach which in this case is to pick an email frequency that you can commit to and then let your audience know what to expect.
Let's dive into the brainstorming process
First: Select your creativity-conducing environment.
It is important to have the right environment for this process. There are two ways to go about this process.
Way One - create an nice environment where you feel relaxed. Get a cup of hot tea or a rejuvenating smoothie and bring out your notebook (digital or paper) and start scribing. I, myself, like a hot cup of chai tea, a favorite pen and my bullet journal and start writing things down. I also keep my laptop close by to look at my content schedule for blogs and video tutorials for the upcoming month. I may work from my desk, jump on the couch or take to the balcony and brainstorm under sunny skies + fresh air.
I like to do this brainstorming in my bullet journal because for in next brainstorming session, I may like to look at what ideas I came up last time. There is always a seed for something in there - either a blog post, an email topic idea or even a digital product.
But you may also choose to scribble on a whiteboard, scarp paper or sticky notes. Use whatever throws your hair back! (If you're wondering, I heard a South African speaker use this phrase in a Ted Talk to mean "whatever works for you". But I think you got that by context!)
Way Two - take a couple of hours to go your favorite spot in nature. I like to go for a hike on one of the nearby trails with my husband. Long walks usually free my creativity and ideas start to pour in. I bring with me a ultra mini-journalist's notepad (fits in my palm) or sometimes I use a voice recorder app on my cell phone to record ideas (like last week when I had the notebook but forgot the pen in the car)!
Actually, there's a third way to do this: Go for a walk (Way Two) and then come home and brainstorm (Way One) - and you benefit from the best of both! Tell me in the comments what works for you!
Second: Look at your upcoming content calendar
That's a great place to start. You can begin by looking at what blog posts, video tutorials or podcasts you have planned out for the upcoming month. Of course, this means that you need to have your content schedule already in place. Then, you can derive your emails from that. But as I pointed out in the last post, you cannot always email your list an update on your latest content (see more on that in the intro section of Blog post 032). And that's why we are doing this Email Content Creation Process in the first place, right?
So looking at your publishing calendar for the next month, pick out any topics that you do want to inform your list about. This alone will give you at least one, maybe two things you can use for emailing.
Third: Think about the challenges of your readers/audience
This part, I really love because you get to think from the point of view of your reader. Begin to think about what challenges they have and how you can solve them.
What I do is look through some questions that serve as thinking prompts and help me to come up with some ideas. You can see these questions below. I’ve written these up using names of people to make it more real.
(By the way, you can use these very questions to come up with ideas for your blog posts or video tutorials as well).
Here are some question to start you off:
1. What is Jenny potentially struggling with right now?
2. What tutorial could help Paul to visually solve a particular question in a specific field?
3. What are some common questions I’ve seen in FB groups asked by people like Jenny and Paul?
4. What did I need to learn when I was starting out on?
5. What is the one thing that everyone in my audience needs to know?
6. What new thing has happened in my industry/niche that I can inform my audience about?
7. Which topic can I put my own spin on and present to my readers?
I encourage you to come up with some questions that you find helpful. And then share them in the comments so we can all benefit.
Fourth: Shortlist the best ones
Next, see what kinds of topics you’ve come up with. From step 3 of the Email Content Creation Process, you know that you need x number of email topics for the next month. For example, there are 5 Wednesdays in November when I send out emails. So I will need 5 email topics.
Simply select these many topics from your brainstorming process. You will have many more good ones so keep them for the next month.
When selecting your four or five or however many topics, see if they can all be threaded together in a theme in a way that each week you are building upon them. This will make it all the more easier for your readers to digest the content.
Fifth: Add them to your Email Content Calendar
Finally, add these titles to your Email Content Calendar on Google drive or Asana. I've just discovered Freedcamp. I played around with it and absolutely love it's versatility. Plus I can switch back and forth between list view and Kanban view. I think this might be a topic for a blog post too!
Here's how my Email Content Calendar for November looks in Freedcamp:
This the view of my Email Content Creation Calendar in Freedcamp
Well, after this, you are all done. You've brainstormed, shortlisted and plugged in your email topics into your Email Content Calendar. Bravo!
Share with me:
What brainstorming questions did you like from the list? Do you have some of your own to add to this list? Do have a favorite tool you would like to use for this process - share with me?
Share with me in the comments! Also, I'd love to know if you've got any questions.
Warmly,
Sophia

032: My Complete Weekly Email Content Creation Process
One of the pillars of a successful email marketing plan is Keeping In Consistent Touch with your audience - by sending them regular emails. Of course, how often you email your list will be based on the stage you are in your business and the frequency that is best suited for your audience.
Whether you email your list once a week, once a month or twice a month, you need to have consistent content going out. But how to come up with new topics and have them all ready without burning the mid-night oil?
Take a look at this complete Email Content Creation Process that I use for my business.
One of the pillars of a successful email marketing plan is Keeping In Consistent Touch with your audience - by sending them regular emails.
Of course, how often you email your list will be based on the stage you are in your business and the frequency that is best suited for your audience.
Whether you email your list once a week, once a month or twice a month, you need to have consistent content going out.
Sometimes just sending a headsup to your email list that your new blog post is out, works.
But at other times, it will not work.
Sometimes your blog posts simply don’t translate naturally into newsletter ideas.
Take a look at this example from my own business:
Recently I created a blog post about how to import lists from Mailchimp to ConvertKit. Because I know that many of my current subscribers are already on ConvertKit, I don’t want to send them an email telling them how to do it. This blog post is for those on my list who are in the first phase of the process — (If that’s you, check out the complete 23 page free Guide here).
So sending an email to my list about that new blog post would not serve them all. It may even turn them off.
Instead, I send them something more relevant across the board regardless of whether they are starting out or already a few steps ahead.
But how do you come up with newsletter ideas week after week? Especially, if you've already got a full load of content for your blog posts laid out.
There is a way you can take care of this conundrum. And I would like to share with you my exact process for coming up with email topics so that I keep my list well informed with useful content. I am sharing this with you hoping that it will help you do the same in your business.
Email Content Creating Process -
A Complete Step-By-Step Guide for Planning, Creating and Scheduling Your Emails All In Advance.
Seriously, it is not easy to have refreshing content each week. And I am utterly tired of having to get into the creative thinking space on a deadline. As you may know yourself, there are some things that benefit from a hard deadline. But for others, you need a better system in place — a habit system which benefits from a hard deadline but is not entirely dependent on it.
This is what I mean:
What if you could have enough new content for your audience planned, created, and scheduled in advance? What if you created that content while you are in a creative phase, well in advance of when it is to be scheduled? What if the hard deadlines help you to schedule things at certain dates but are not there to create pressure and stress?
Well, then, I’d like to introduce you to my newsletter content creation process. This entire process is to be done only once at the end of each months. So essentially, you do this 12 times a year.
Here is how it works:
Step 1. Set aside 2 days for the Planning Process
Step 2. Begin Planning Process - Brainstorm - Day 1
Step 3. Check how many weeks there are next month - Day 1
Step 4. Circle the best topics - Day 1
Step 5. Write the emails - Day 2
Step 6. Schedule them in ConvertKit - Day 2
Step 7. Set aside 2 days for the next Planning Process - Day 2
Step 8. Enjoy an afternoon off (very very important) - Next Day
Step 1. Set aside 2 days for the Planning Process
It's great to batch process content and the ideal is to have all your emails ready for the next quarter before the quarter begins.
But we can begin with the first goal:
Goal: To have all emails ready before the start of the next month.
I think this is a bit more feasible as a first step.
So at the middle of the month before the emails are to go out, block out a two day time slot for the Planning Process.
For example, for getting all my emails ready for November, I've set aside two planning days in October.
This is a page from my Bullet Journal where you can see my two Email Content Planning Days: Oct 16th and 17th.

Email Content Creation Process Scheduled in Freedcamp, my project management tool of choice. You can see Day 1: Oct 15th is for brainstorming and Day 2: Oct 16th is for writing the emails out.
This step is exactly like step 7. Essentially, you are blocking of days for the next month as soon as you are at the end of Day 2 of each Planning Process.
Step 2. Begin Planning Process - Brainstorm - Day 1
Brainstorm ideas for what you want to email your list. Here you think of possible email content to send your list.
You can begin with taking a look at your upcoming blog posts, podcasts or YouTube content as a starting point.
Think of any announcements that are coming up in the next month.
Just write down any ideas that come up. At this phase, you are just letting the ideas flow. No need to screen or censor them right now.
In this post, I lay out for you some questions that can help you think of potential content along with a worksheet.
Step 3. Check how many weeks there are next month -Day 1
This one is simple. All you are doing is seeing how many weeks there are in the upcoming month. This tells you how many email topics you need to select.
This applies to those of you who are sending out your content weekly. If you have a different sending frequency, just total up what that number is for the next month.
In November, there are 5 weeks. Since I email each week, I will need to shortlist 5 email topics.
Step 4. Circle the best topics - Day 1
Now look at all the ideas you came up with in your brainstorming session. And begin circling the best ones for next month.
In my example, I will need 5 topics for November. So I will go ahead and circle 5 topics.
I will now list them out in a document on Pages. (You can also use Google Docs, Asana or Basecamp* or my new favorite Milanote). This will be my starting point when I sit down to write these emails out in Day 2 of the Planning Process.
Mini-step: After I've selected the best 5 email topics, I also note in my calendar which email topic will go out on which date.
*affiliate link
Step 5. Write the emails - Day 2
The next step is to simply write out the emails.
It may seem that one day for 5 emails is not a lot. I think it is really the other way around.
Writing just one email takes a whole day. But when I am writing so many emails in one go, I think it gets done way faster.
Plus, the key is to start really early in the morning and make writing the first thing you do when you get to work.
I've found that doing any kind of work, especially creating work in the morning hours, gets done faster and the result is far better than writing in the afternoons or evenings.
But hey, do what works. The main thing is that you get the emails done nicely.
Step 6. Schedule them in ConvertKit - Day 2
ConvertKit is a placeholder for your email marketing platform.
The task is to take the text of each of your emails and bring them into ConvertKit as broadcasts.
Send out test emails to see that everything looks good. Make any changes needed.
And wrap it all up by scheduling them according to your email sending schedule.
Step 7. Set aside 2 days for the Planning Process - Day 2
This is essentially Step 1, but you do it at the end of each Email Content Planning Process.
---
So as you can see, this is essentially a batch process to get all your emails out a month in advance.
The next step would be to get more of these emails done before each quarter begins. How cool would it be if by December 2017, you had all emails written out for the first quarter of 2018? That is going to be my new goal for my weekly newsletter!
You can employ a similar process for creating blogs but you will need the added component of social media (creating thumbnails, sharing on FB, Twitter, Pinterest, etc).
Oh and I almost forgot step 8:
Step 8. Enjoy an afternoon off (very very important) - Next Day
This is so important. So often we are in the 'doing' mode, we forget to be in the 'being' mode. We are all human beings after all, not human doings! Well, at least not all the time! ;-)
May be the next day after the planning process, you can the afternoon off with your loved one - be in human, animal or a book!
Share with me:
How do you think this Email Content Planning Process can help save you a bit of the overwhelm and pressures that come from just having deadlines?
Share with me in the comments! Also, I'd love to know if you've got any questions.
Warmly,
Sophia
031: How to Create an Evergreen Sales Funnel Using Visual Automation in ConvertKit
In September, I put together an indepth introduction to ConvertKit's new Visual Automation feature. Here is the video recording of it.
Hello there,
In September, I put together an in-depth introduction to ConvertKit's new Visual Automation feature. Here is the video recording of it. Please post your questions in the comments and come check out dates for the next free live training here.

030: How to import your lists from Mailchimp to ConvertKit in 22 Mini Steps
Moving lists from Mailchimp to ConvertKit is one of the last steps in any migration project. Watch the video or see the screenshots as I walk you through 22 Quick Steps to bring over your lists from Mailchimp to ConvertKit.
Hello there!
Moving lists from Mailchimp to ConvertKit is one of the last steps in any migration project I undertake for my clients. This is because you first need to set up your ConvertKit account, transfer over all content assets and switch over the former Mailchimp forms on your website to the new ConvertKit forms. Otherwise, you will be investing double time. If the forms on your site are still Mailchimp, then obviously you will still collect subscribers into your Mailchimp account and have to go back to bring them over to ConvertKit - again! Don't do that! ;-)
So let's say you've done all the other tasks that a migration project requires. Only now you are ready to import your subscribers from Mailchimp to ConvertKit! Yayy! This is the fun part.
I've laid out the process in tiny, itsy bitsy, mini-steps with screenshots for you below! Enjoy!
OR you can watch this short video as I walk you through the steps.
Follow these 22 Mini Steps to Import your Lists into ConvertKit:
1. Create the tags
The Mailchimp lists will be imported into tags inside ConvertKit. So first set up the tags inside your ConvertKit account for each list you want to import. You will see the blue Create a Tag feature at the very bottom of the Subscribers Tab.

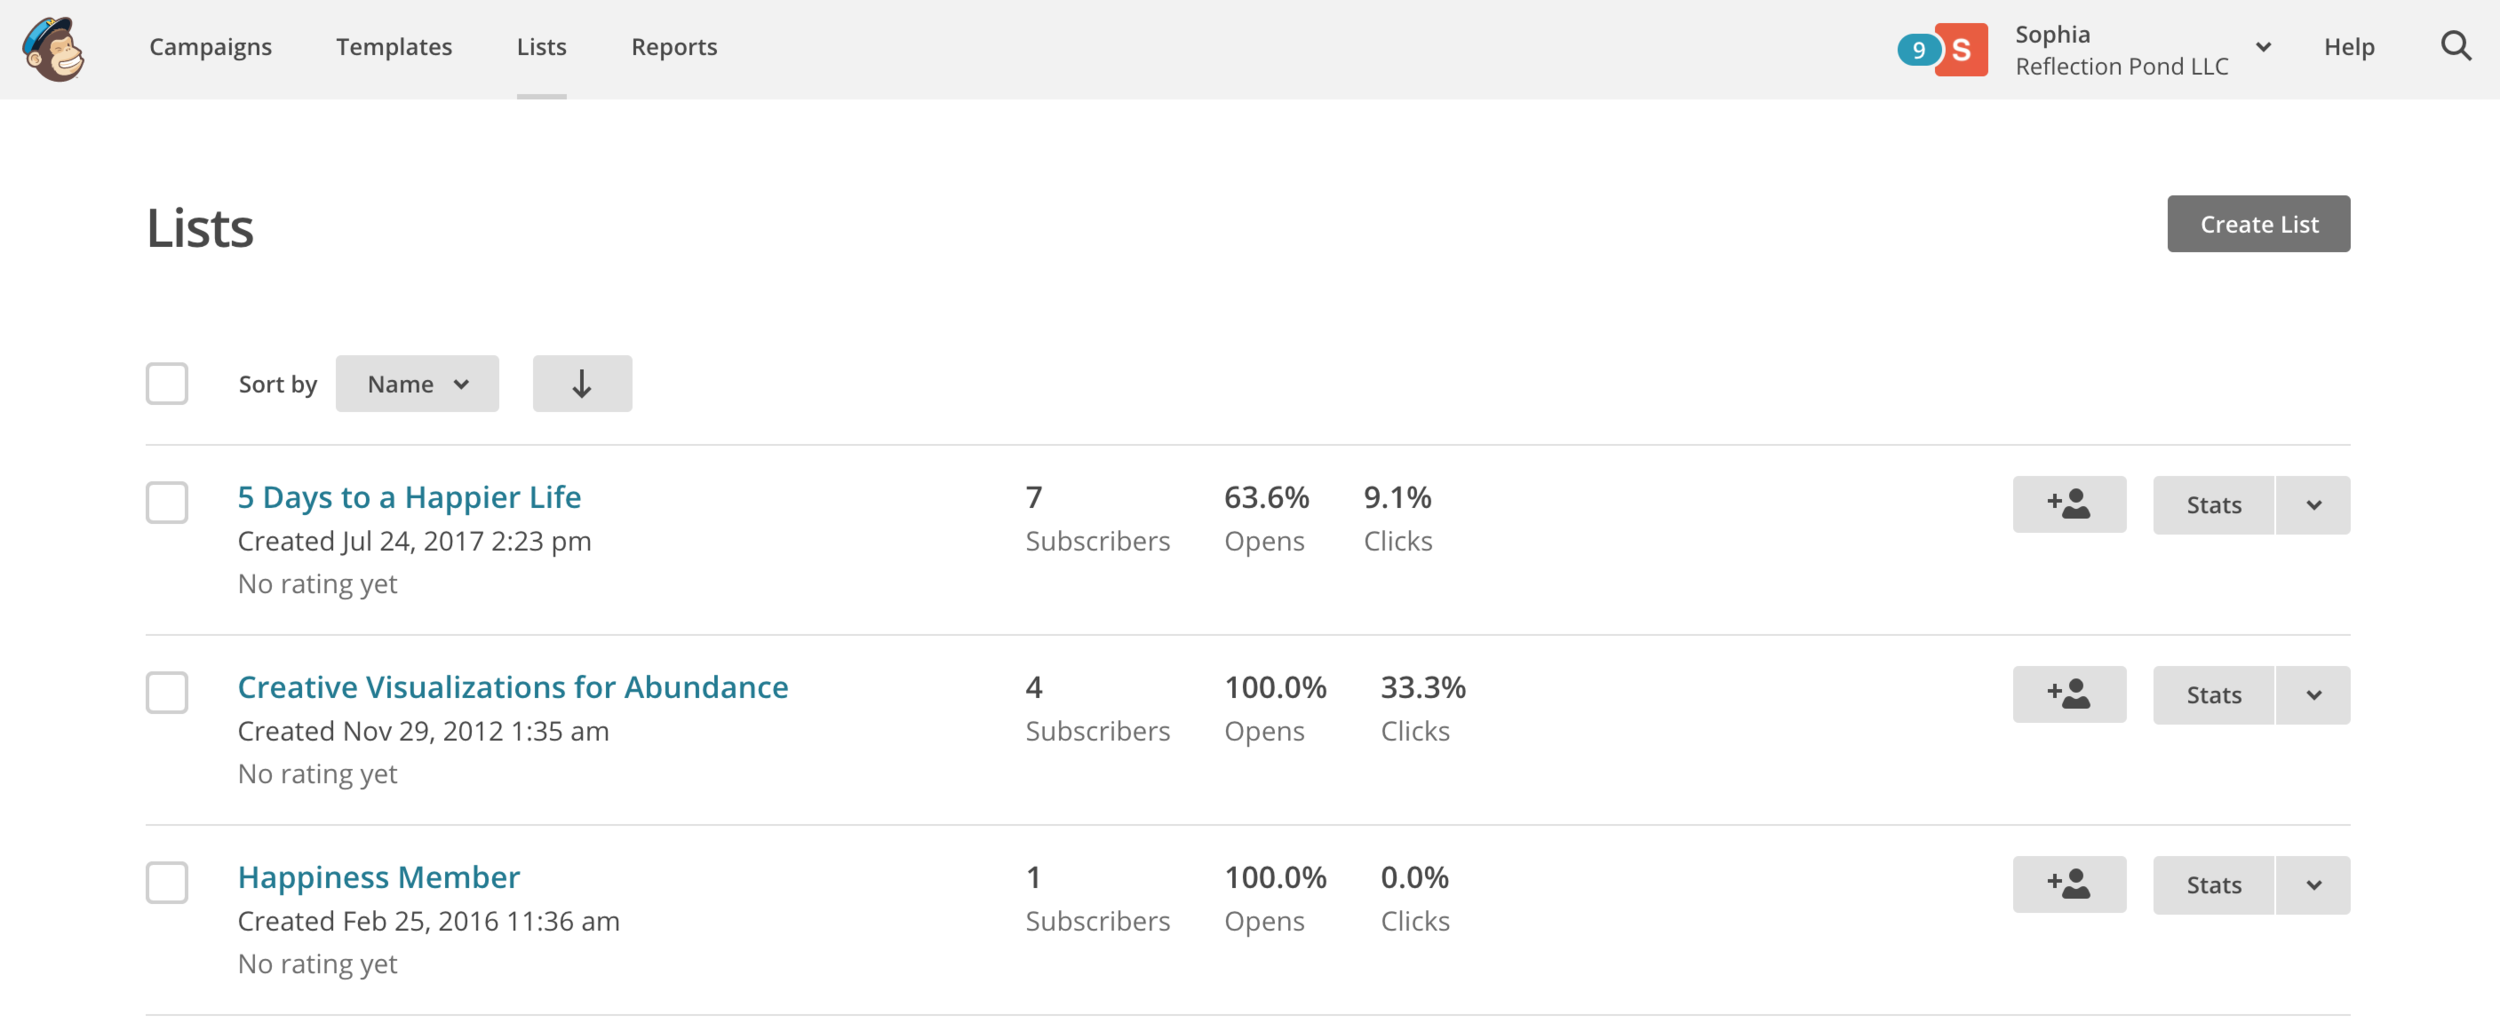
2. In my example for this video, I am importing a list called Happiness Members in Mailchimp.
So it gets imported into the tag: "MC Import: Happiness Members". You can name the tag so that even three months from now, you will know exactly what it contains or why it was set up.

3. Next, open up Mailchimp. Click on "Lists" on the top bar.
4. Select the list you want to import.
In my example, it is the third one called "Happiness Member".
5. Once I click on Happiness Member, it opens up to this screen.
Now you will need to click "Export List".

6. You will see this yellow clock icon while it is still importing.
You will need to wait a few minutes before it changes.
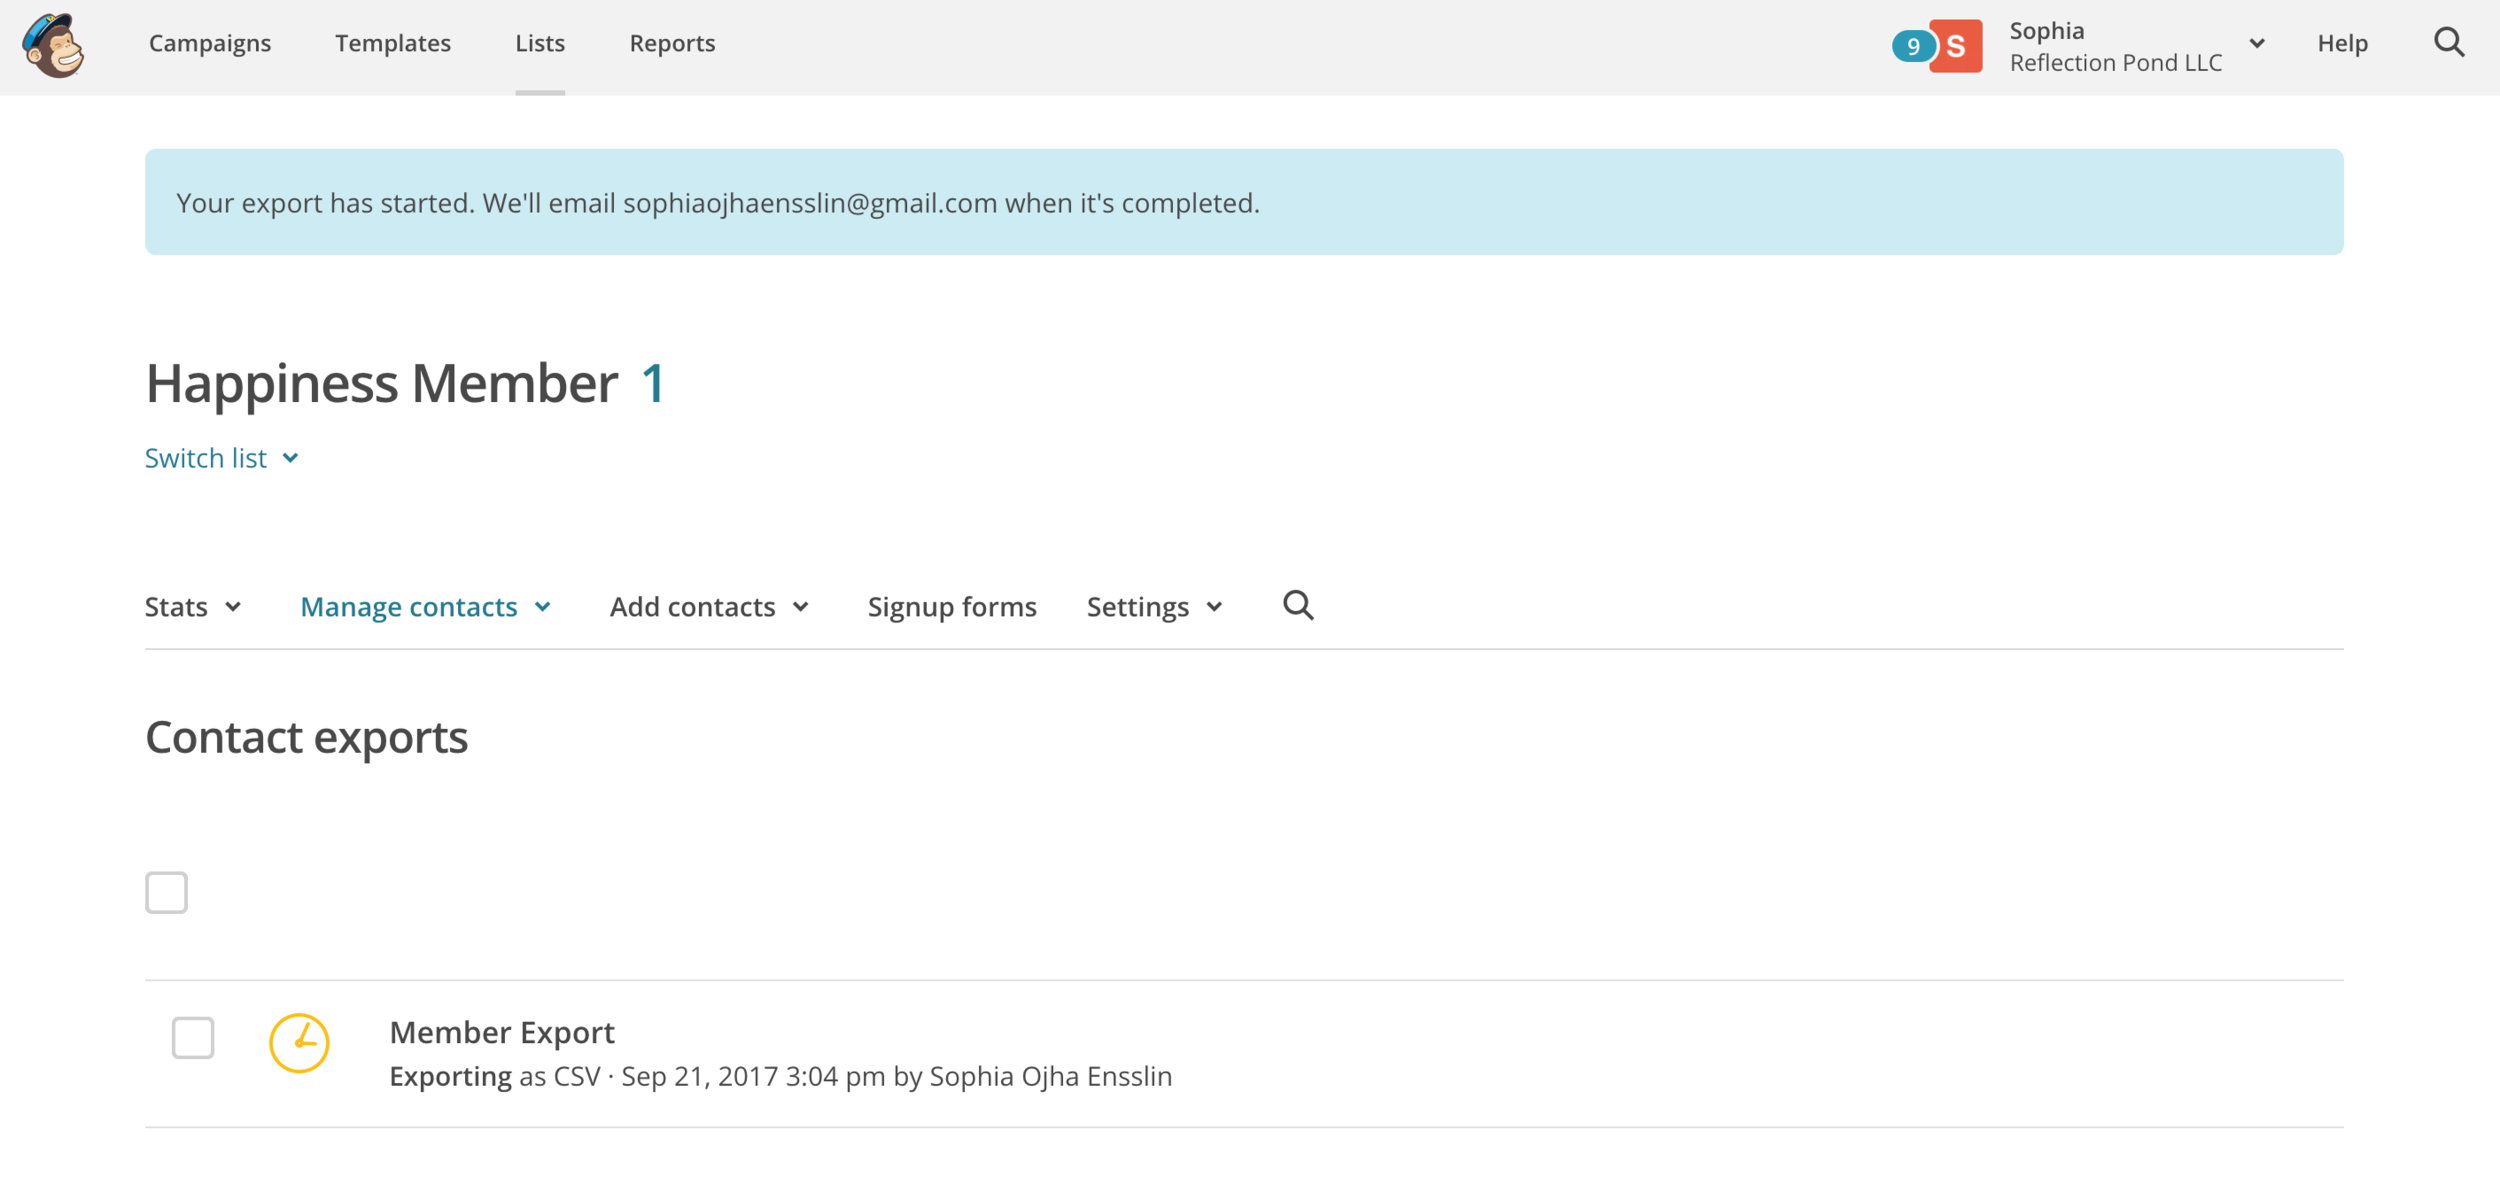
7. Now the icon changes to blue with a check mark inside.
Now you are ready to click on the grey button on the right that says "Export as CSV"

8. When you click that grey button, it will begin to download.
It will go to your "download" folder (or elsewhere if you've set it to go to a dedicate folder).
And it will show like this on the foot of your browser window as it does for me.
(I am using Chrome on a Mac. It may look differently on your system).
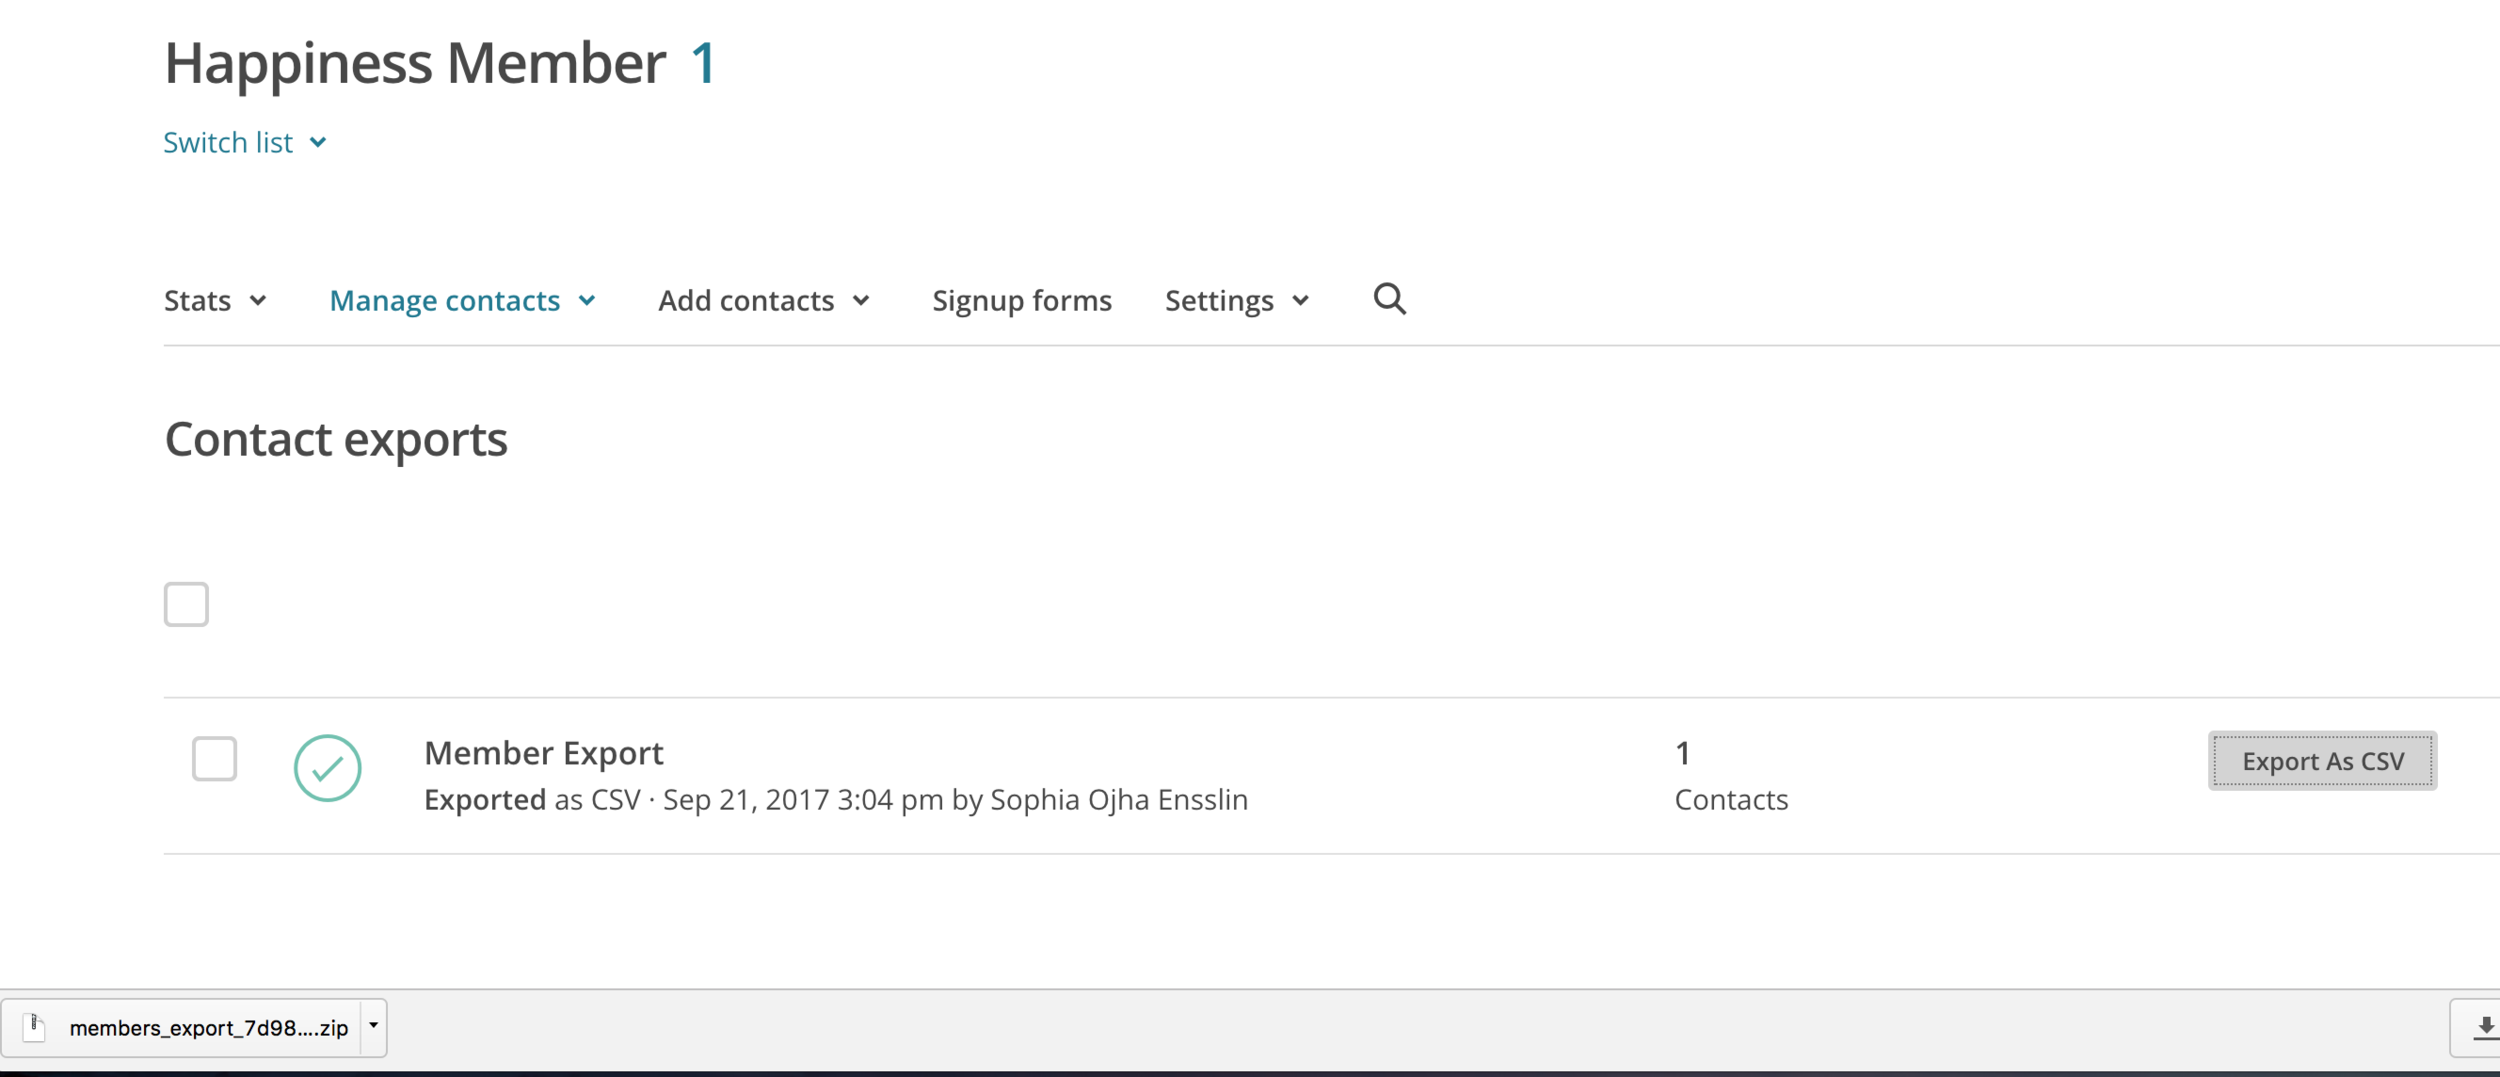
9. It will download as a .zip file.
Now double click on the zip icon to open it.

10. You will see the contents of the zip file show us as a list below it.
In my case, it's just one .CSV file. Yours may have more than one files listed. Look for the one starting with "subscribed". These other files that may open up containing info for for unsubscribed or bounced emails.
So make sure to look for the file that says "Subscribed_members_export..."

11. Name this .CSV file right away in your downloads folder
Especially, if you have multiple lists. This will make your life easy and the import accurate. Give it a name that corresponds to the List it contains. So in my example, I added "ListHappinessMember" at the very end of the file name.
12. In ConvertKit: Click on the grey sign called "Import subscribers".

13. This drop down will show up.

14. From the dropdown menu, check off the tag into which you want to import this List from MC.
Note you can select multiple tags if that makes sense in your email marketing game plan.
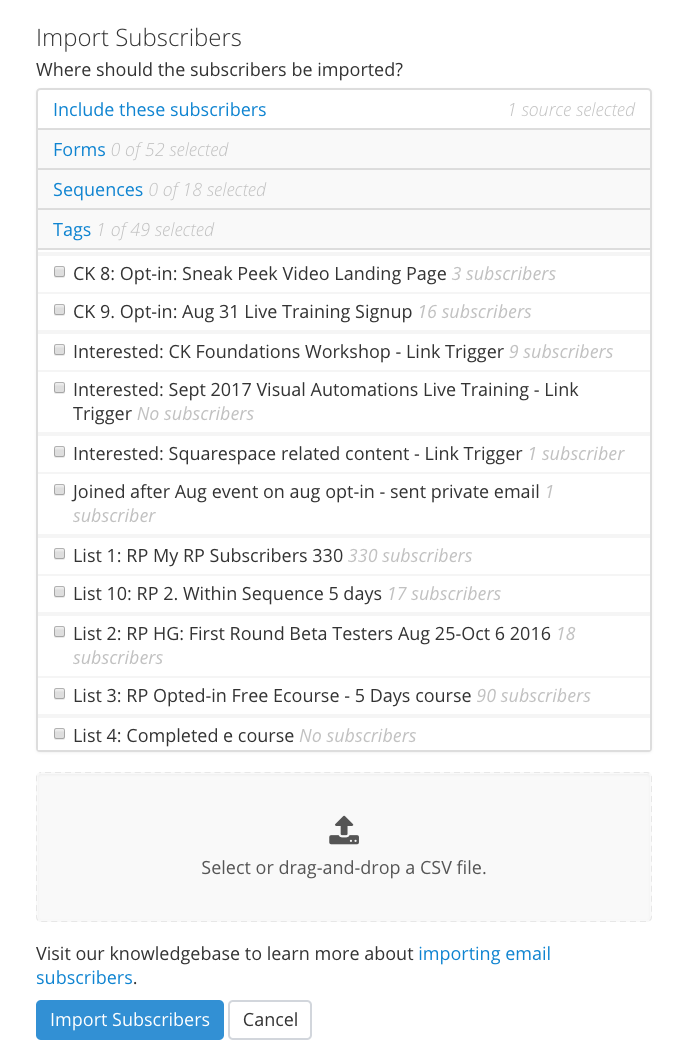
15. Drag the "Subscribed" .CSV file into the grey box on the right.

16. This is what it looks like next.
You will see these columns that need to be mapped to a corresponding field.

17. First select the corresponding fields to match Email like you can see in this screenshot.
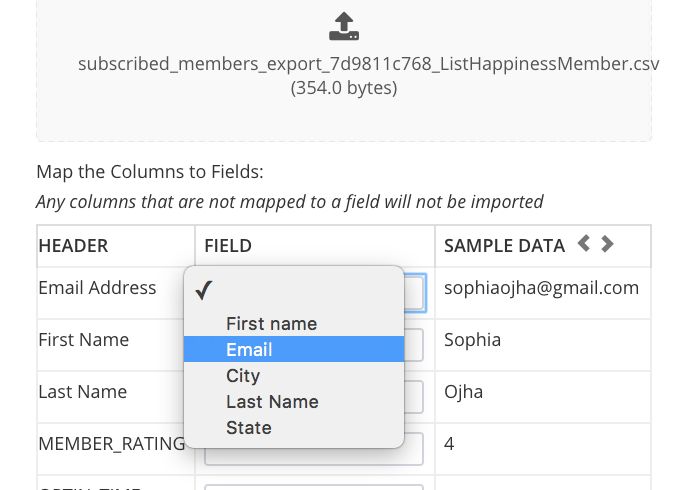
18. Next select the corresponding fields to First Name.
You can choose to leave the rest empty. If you do want the other info, you will need to create custom fields in your ConvertKit account first.

19. This is what the correctly mapped fields look like. Now click the blue "Import Subscribers" on the very very bottom.

20. Once the file is imported, this mint green bar will show up on the top of your ConvertKit dashboard telling you that the import is a success!

21. You will also get an email from ConvertKit telling you that the import is completed.

22. You are done with importing your first List! Yayy!!
Repeat this for all your lists in Mailchimp
Pro-tip and a big time saver:
I highly recommend you complete these steps for each list before moving on to the next list. This is where batch processing (or exporting all lists first) can get confusing - because when the CSV file downloads from Mailchimp, you do not see which list it belongs to. It's a garble of numbers and letters that make up the file name. Very difficult to identify!
So name the zip file and the folder inside it as soon as you download it. This will make it easy to identify the right file for the right list and you will accomplish the job faster and accurately.
That's it. Let me know how your transferring of lists went in the comments below.
Plus, if you have not done all the steps before this stage, download my free checklist to help you prep before you move to ConvertKit.
Peace,
Sophia
028: How Often Should You Email Your List?
No matter what approach you take to emailing your list, one thing is clear ⏤ you must start writing to your list, regardless of the size of your list.
But how often shall I send an email to my audience?
This is a question that stumps a lot of people.
No matter what approach you take to emailing your list, one thing is clear ⏤ you must start writing to your list, regardless of the size of your list.
But how often shall I send an email to my audience?
This is a question that stumps a lot of people.
There are some online sources that say you must email your list at least once a week while others suggest emailing twice a week. Still others recommend emailing your list every other day, especially during the launch of a product.
Personally, I do not subscribe to any of the above suggestions.
The Zen Approach
My approach is different ⏤ it’s what I call the Zen approach to email marketing. In fact, I am building my entire business on the values of simplicity, compassion and inspiration from nature. So when it comes to making key decisions, I use these questions to guide me:
+ What is the simplest way of accomplishing this _________ (goal/task/solution) that makes all other ways meaningless?
+ Will taking this path be a compassionate way to serve my audience while also being compassionate to me and my team?
+ What inspiration can I draw from nature’s wisdom in solving this situation or serving my client/reader?
In other words, what is the Zen way of doing things?
Clarify Your Approach
It is time to figure out what’s the best frequency for emailing your audience in your business. If you already have a set schedule, reassess your current schedule with the following guidelines. I recommend that you take these two steps:
First:
+ figure out the three values that are core to your business. Then, based on those values, craft questions that you can use to decide on this and other such questions in your business.
Or ask yourself: what will be the simplest way for me to communicate with my audience that makes all other ways meaningless?
Second:
+ choose a frequency you can commit to
The answer you come up with may not fit the mainstream advice you get on the popular email marketing blogs. And that is exactly how it should be. The answer you come up with should match you, and be in alignment with your values. That’s the most important thing.
Because if you are doing things in alignment with your business and personal values, then you will attract an audience that is also in alignment with your business. Isn’t that what you want?
So you may come with any one of these frequencies:
weekly
twice a month
monthly
every two months
quarterly (four times a year)
Whichever you come up with, will be the right frequency for you.
Commit To This Frequency
Once you come up with the answer, make sure that you can commit to it for at least three months. If you miss during this time, just recalibrate and come back to your committed frequency. After three months, if you realize your are not making it happen, reassess what needs to change.
In Alignment With Your Values
So this approach helps you take a path that is a bit more in alignment with who you are and where you are in your journey. This is a more compassionate way to go about it. It’s more compassionate to yourself rather than just taking a cookie-cutter approach and saying to yourself, "If I am to succeed, I have to do this ⏤ even if it doesn’t resonate with me”.
The bottom line is:
If the frequency of your emails doesn’t align with who you are right now then it’s going to be a path laid out with extra obstacles. You can give it a try and see it for yourself.
Whatever you do, it must feel natural and make sense to you, your instinct and your sense of integrity. If the emailing frequency doesn’t work for you, it is not going to work for your audience because you are attracting a certain kind of audience. If anything you do feels forced, unnatural or inauthentic, the results are not going to be sustainable.
The next step is to have that frequency clearly expressed to your audience. Let them know when they sign up, in the welcome email, even at the bottom of the emails (see the bottom of my emails for one example). Again, it is essential that your audience knows what to expect.
My Zen Approach
For many months, I sporadically created blog posts and video tutorials about how to use ConvertKit and email marketing strategies ⏤ 27 posts by now (I love to count). But a few weeks ago, I asked myself some questions. I realized that to serve and attract the right audience for my business, I needed to create more useful content on my site. As a result, I committed to following a weekly schedule for publishing content on my site as well as emailing my audience.
A week seems long enough for my reader to digest and implement new content that can truly help them. This way each week my audience (that’s you!) can implement one more piece in their business with my help.
On top of that, I have also come to realize that the old adage “practice makes perfect” is really powerful. I know that the more content I put out, the better I get. So, for me ⏤ choosing a weekly schedule of emailing my list makes complete sense. Not because the gurus of email marketing say so. But because if fits my business goals and business values and something I felt I can commit to.
Different Approaches
Different approaches work for different people because it works for the content creator and their audience knows clearly what to expect.
Blogging and your online business should not become another thing that causes stress and upset in your life. It should be a source of joy and peace and contentment and a way to create value in the life and business of others. Not the other way around.
So tell me:
What are you business values and how frequently will you email your list?
Share with me in the comments!
Warmly,
Sophia
027: ConvertKit's New Visual Automation - What's the buzz?
In June 2017, ConvertKit announced at the Craft + Commerce Conference that they would release a new feature - the visual automation. Everyone oohed and aahed as the audience gasped (yes, I was one of the nerds getting excited to see the demo). So what's the buzz about? Here's my take...
In June 2017, ConvertKit announced at the Craft + Commerce Conference that they would release a new feature - the visual automation. Everyone oohed and aahed as the audience gasped (yes, I was one of the nerds getting excited to see the demo).
The Time Line of Release
August 1st - Beta Testing to the first 6 and more (yes, I was one of the 6 - yayyy!)
August 22nd - First 1000 customers receive access
September 5th - All ConvertKit Customers get access
So what's all the buzz about?
Well, one of the contentions that a lot of people had about ConvertKit was that there was no visual way of setting up the funnels like in other platforms like Active Campaign, Infusionsoft, Drip and Mailterlite. ConvertKit's team was fully aware of this and was working hard to create a feature that would do the visual automation better.
Why Sending Targeted Content is Important?
If you want to see a demo of what Visual Automation looks like, then definitely make time for my live video training on Sept 28th to show you my dashboard. But in short, with visual automations, you can customize the journey your subscriber takes within your funnels in a highly visual way.
You can still scribble the funnel on a piece of paper but now you will be able to do this right inside your ConvertKit account. With great ease you can connect events, actions and conditions (more on that in the live training). And you can even edit sequences and forms from right within the visual automation/editor!! (This is what made me gasp when Nathan demonstrated this at the June Conference - yes, it's that good!).
Visual Automations will make you ooh-aah in delight!
Not only will this make funnel building easy, you will also be able to track how well your content is doing. You can see at a glance how your audience is responding to the materials you are sending them.
There's only one way to say this: this is a game changer. I know, I know, how cliched!. Nathan Barry, the founder of ConvertKit calls the new visual automation, "the most substantial product update in our history." And I'd like to show you what this automation looks like on the inside.
Sign up for the next Live Training:
When: 2pm EST, Sept 28th, 2017 Thursday
What: Live One Hour Training - Basics of the New Visual Automation Feature in ConvertKit
On Thursday Sept 28th, I am holding a free live training (no pitch) on the new Visual Automation Feature in ConvertKit. I will be showing you how you can send specific content to subscribers within a specific tag and how to send them something else if they don't have that specific tag.
I will also explain the difference between Event, Action and Condition - the three pillars that you will be building your funnels on. This way you can pitch something only to those who are yet to become customers and spare your existing customers from the sales talk - and in this way send very targeted content to your audience.
If you'd like to learn how to do all that, this training is for you. You can also ask me questions live and see if I can answer them!
What can Visual Automation be useful for?
You can use the visual automation for all the things you are already doing in your account. But if you are not fully optimizing the use of your ConvertKit account, then Visual Automations can help you.
You can do all of this with ease:
Build out a Welcome Sequence
Create a Sales Sequence only for non-customers
Add subscribers from different forms into a single sequence
You can create a Webinar sequence - pre and post webinar
You can create surveys inside your welcome email and tag people according to their responses
If you are currently in the process of building out any of these, let me know. If possible, I will do a live demo for you to implement in your business. You will also get a recording so you can watch and work!
As always write me your questions in the comments below.
Peace,
Sophia