
Simplify Your Life &
Align with Your True North
Choose Your Path
-

Simplify
-

Introspect
-

Quotes
-

Inner-Voice
-

One-Person Business
-

Financial Freedom

030: How to import your lists from Mailchimp to ConvertKit in 22 Mini Steps
Moving lists from Mailchimp to ConvertKit is one of the last steps in any migration project. Watch the video or see the screenshots as I walk you through 22 Quick Steps to bring over your lists from Mailchimp to ConvertKit.
Hello there!
Moving lists from Mailchimp to ConvertKit is one of the last steps in any migration project I undertake for my clients. This is because you first need to set up your ConvertKit account, transfer over all content assets and switch over the former Mailchimp forms on your website to the new ConvertKit forms. Otherwise, you will be investing double time. If the forms on your site are still Mailchimp, then obviously you will still collect subscribers into your Mailchimp account and have to go back to bring them over to ConvertKit - again! Don't do that! ;-)
So let's say you've done all the other tasks that a migration project requires. Only now you are ready to import your subscribers from Mailchimp to ConvertKit! Yayy! This is the fun part.
I've laid out the process in tiny, itsy bitsy, mini-steps with screenshots for you below! Enjoy!
OR you can watch this short video as I walk you through the steps.
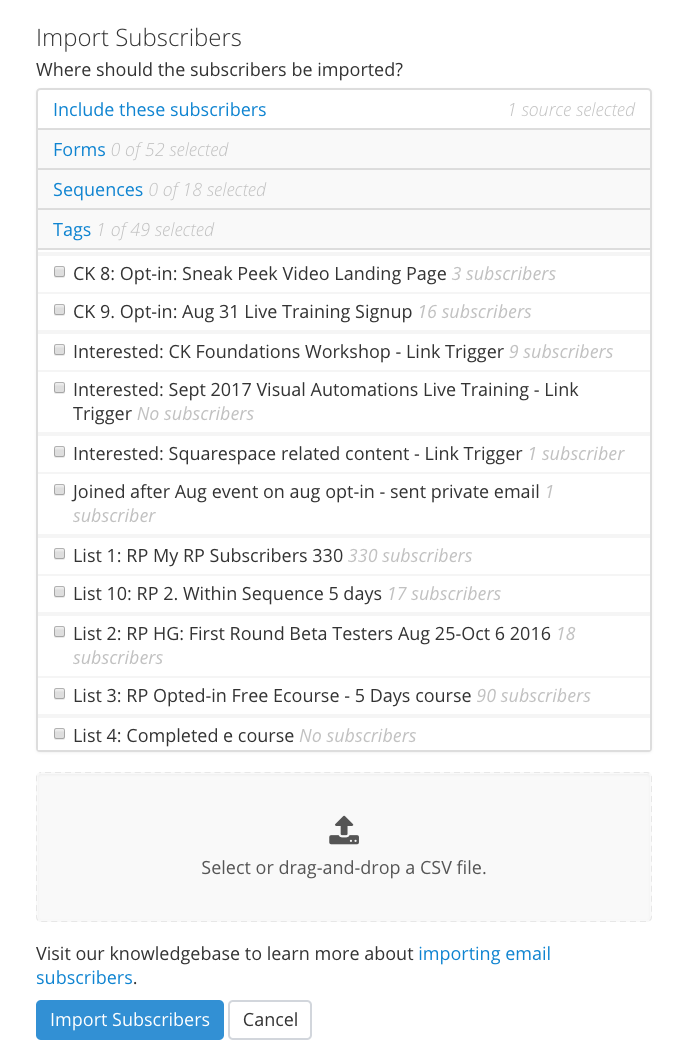
Follow these 22 Mini Steps to Import your Lists into ConvertKit:
1. Create the tags
The Mailchimp lists will be imported into tags inside ConvertKit. So first set up the tags inside your ConvertKit account for each list you want to import. You will see the blue Create a Tag feature at the very bottom of the Subscribers Tab.

2. In my example for this video, I am importing a list called Happiness Members in Mailchimp.
So it gets imported into the tag: "MC Import: Happiness Members". You can name the tag so that even three months from now, you will know exactly what it contains or why it was set up.

3. Next, open up Mailchimp. Click on "Lists" on the top bar.
4. Select the list you want to import.
In my example, it is the third one called "Happiness Member".
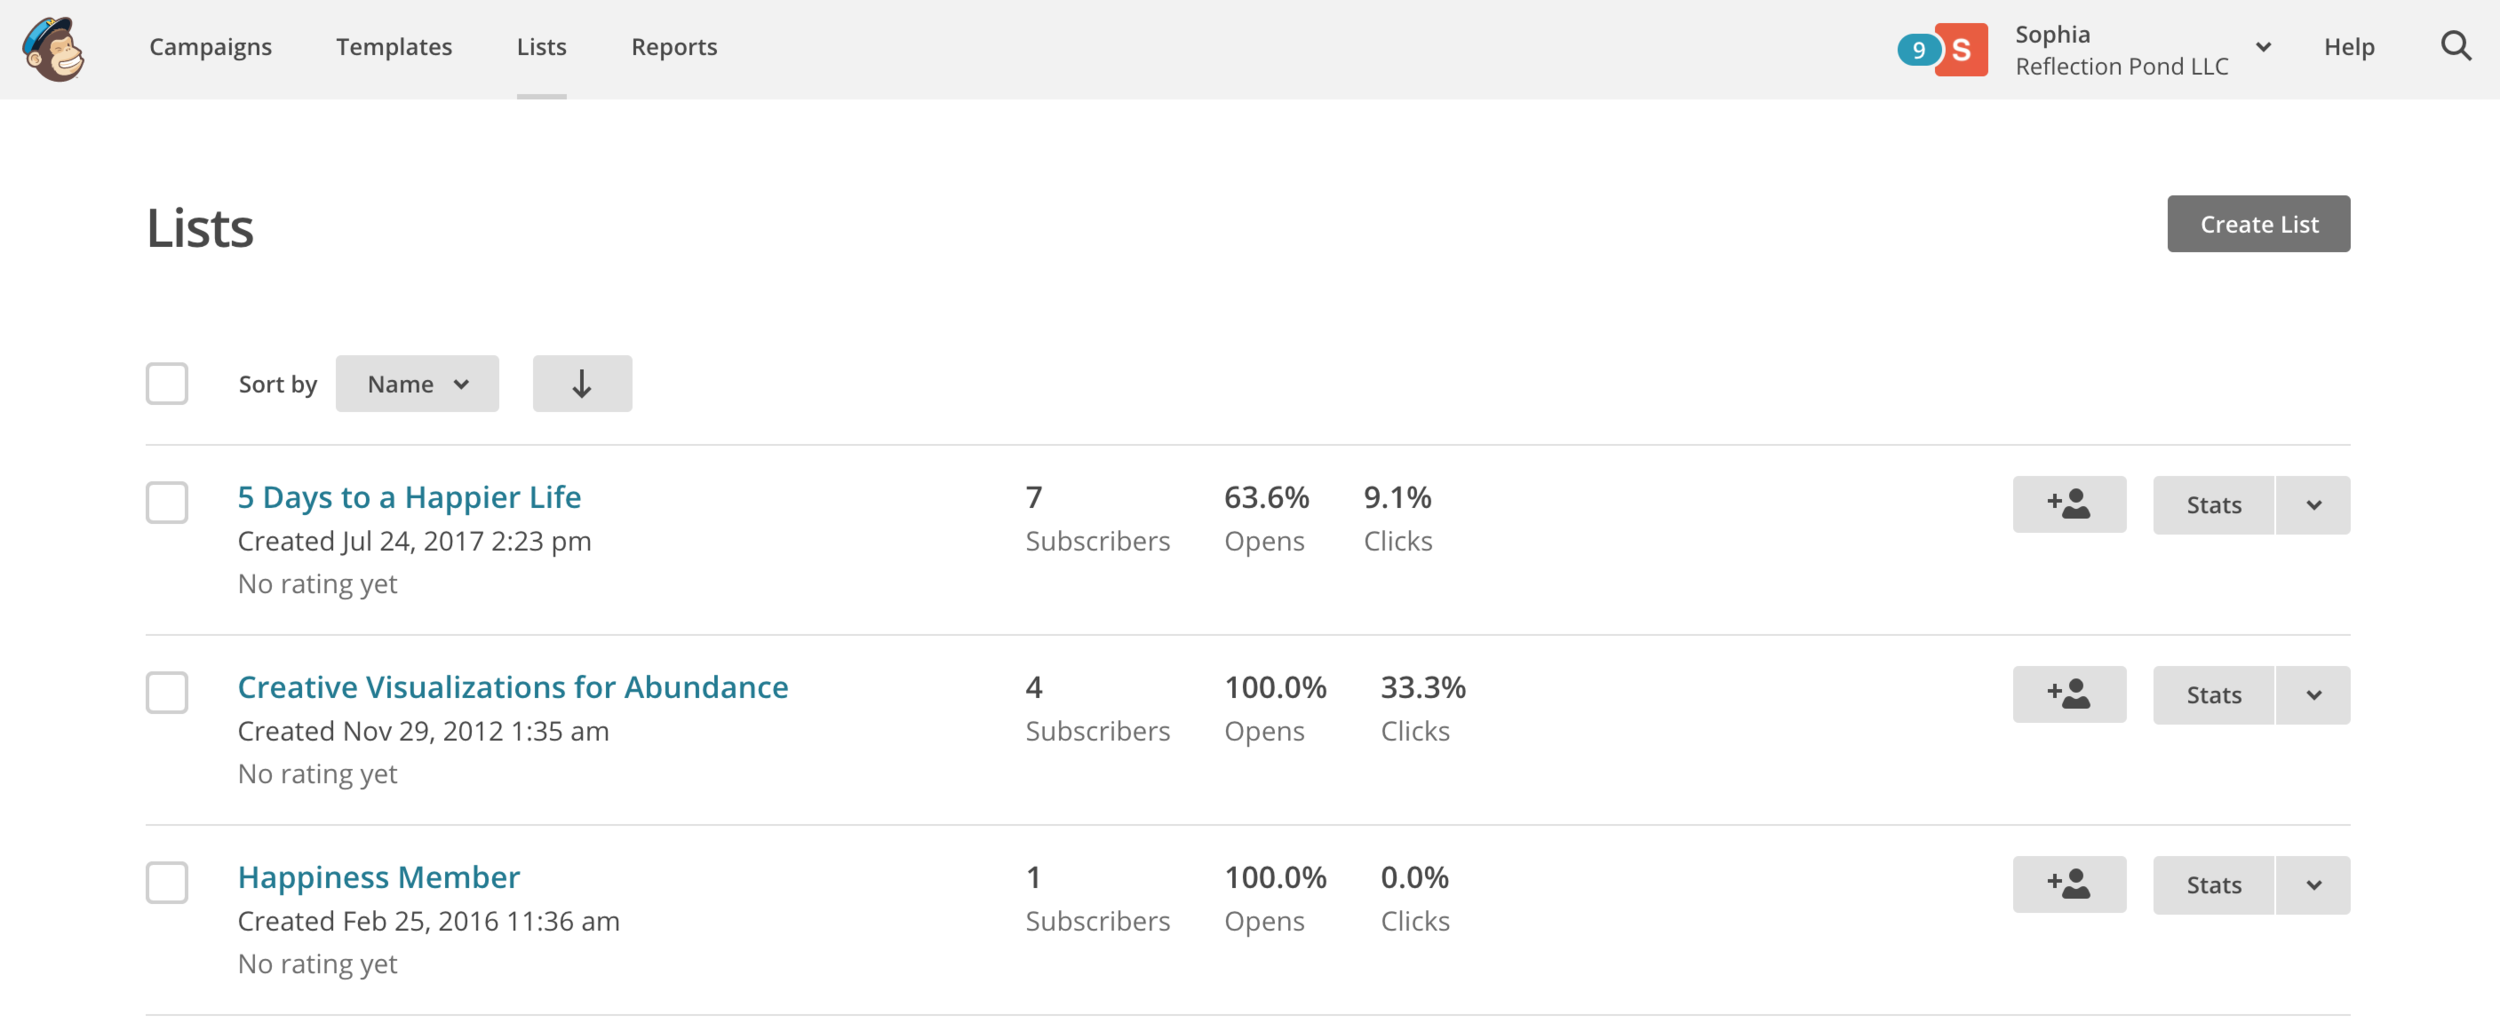
5. Once I click on Happiness Member, it opens up to this screen.
Now you will need to click "Export List".

6. You will see this yellow clock icon while it is still importing.
You will need to wait a few minutes before it changes.
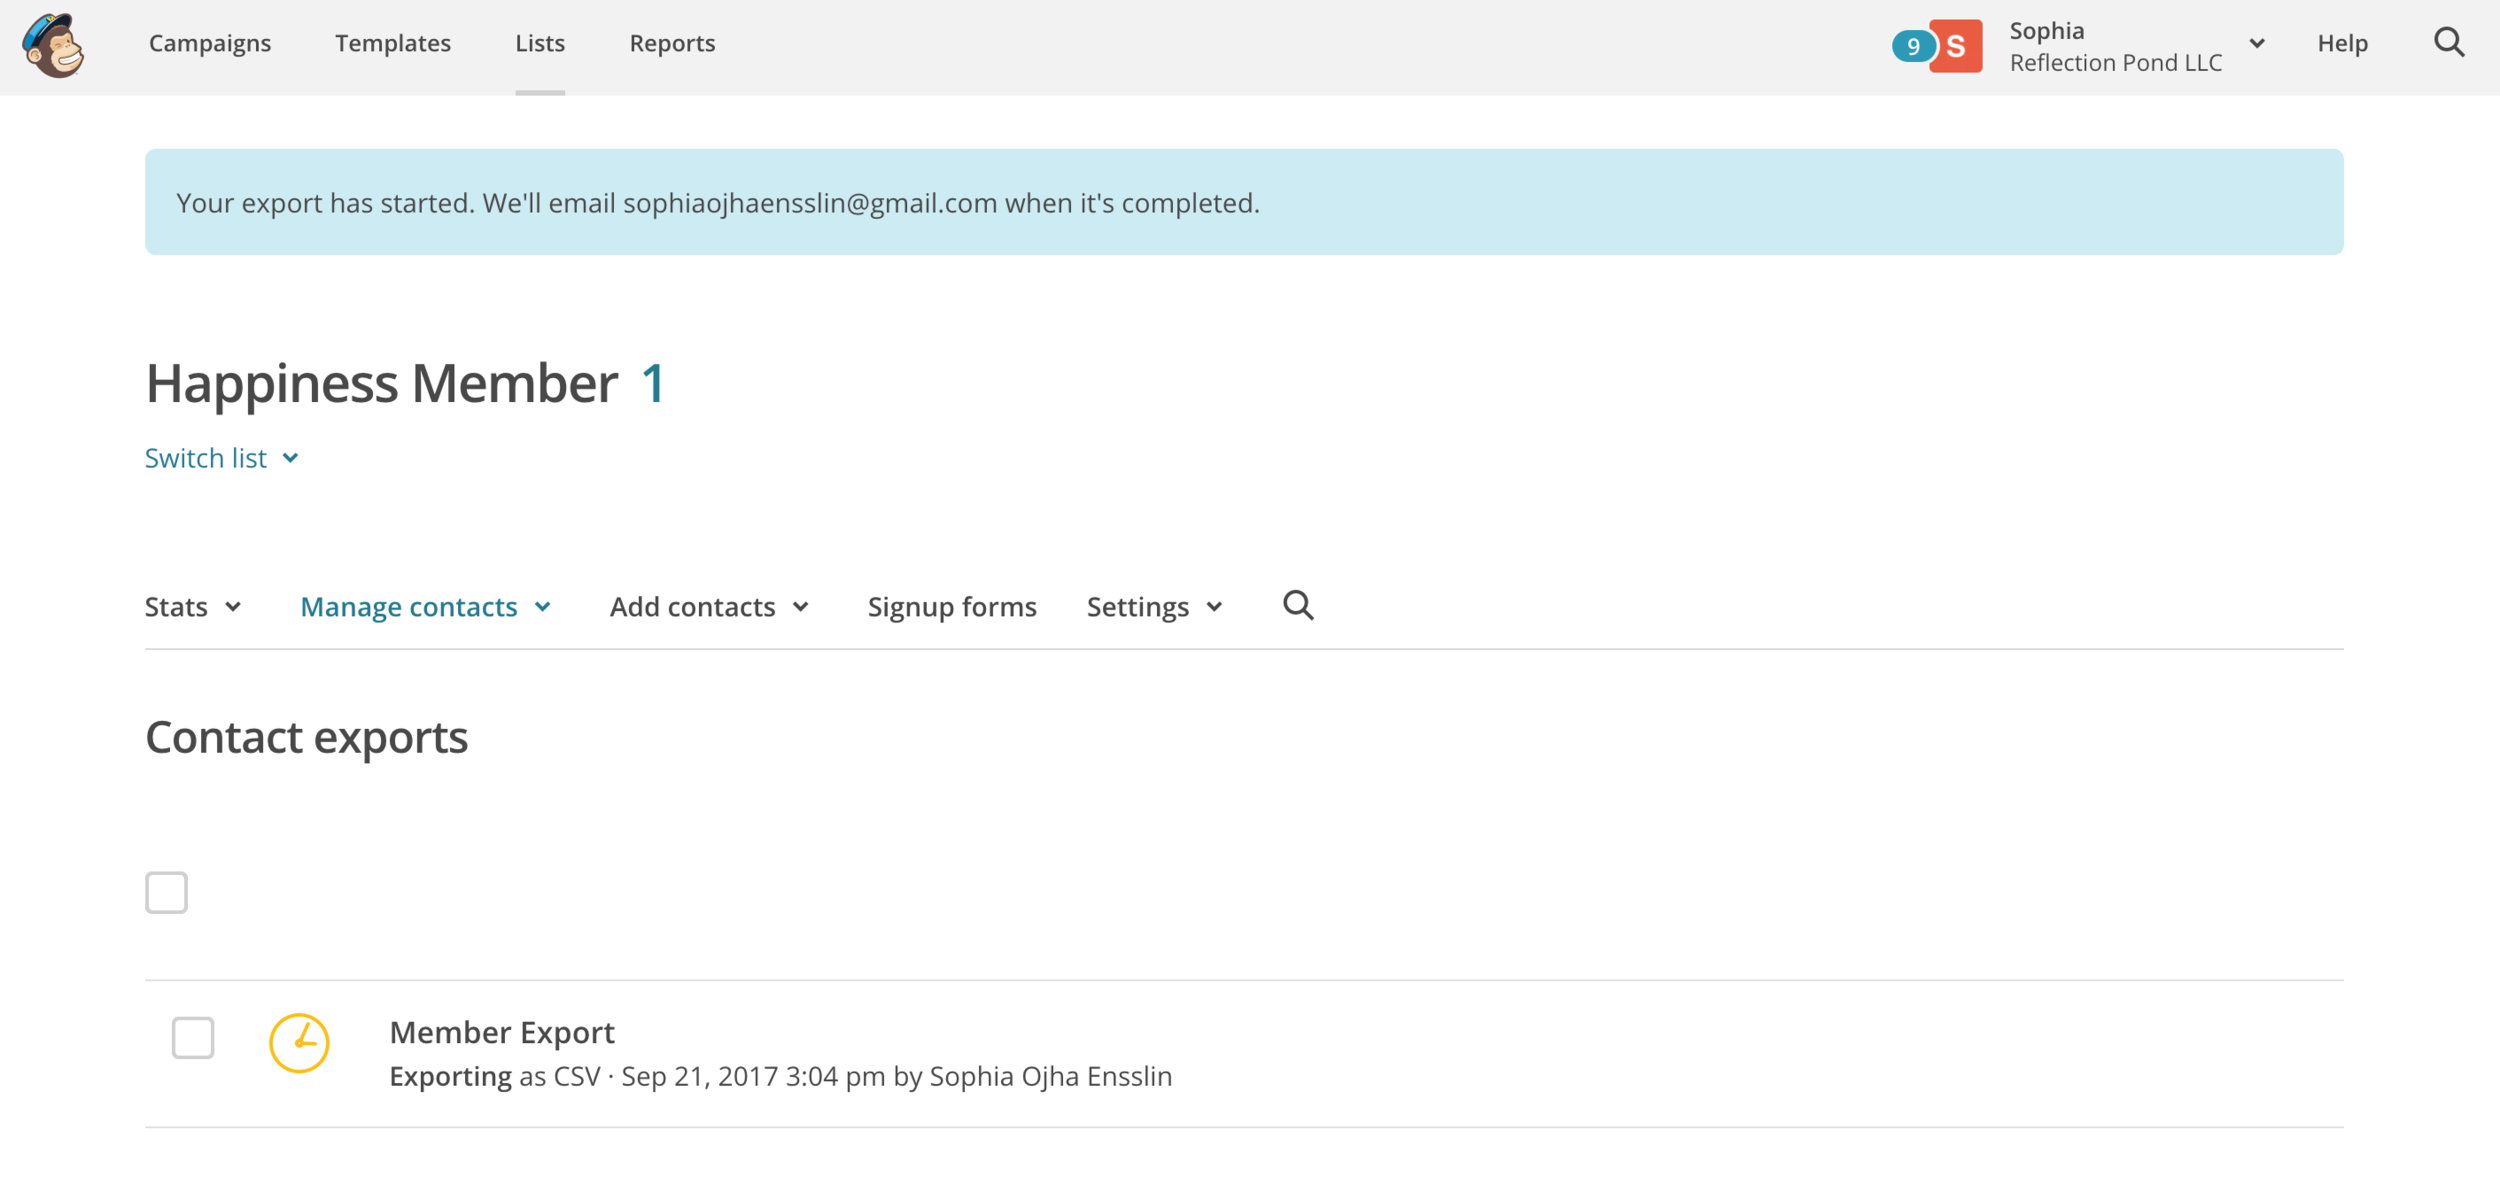
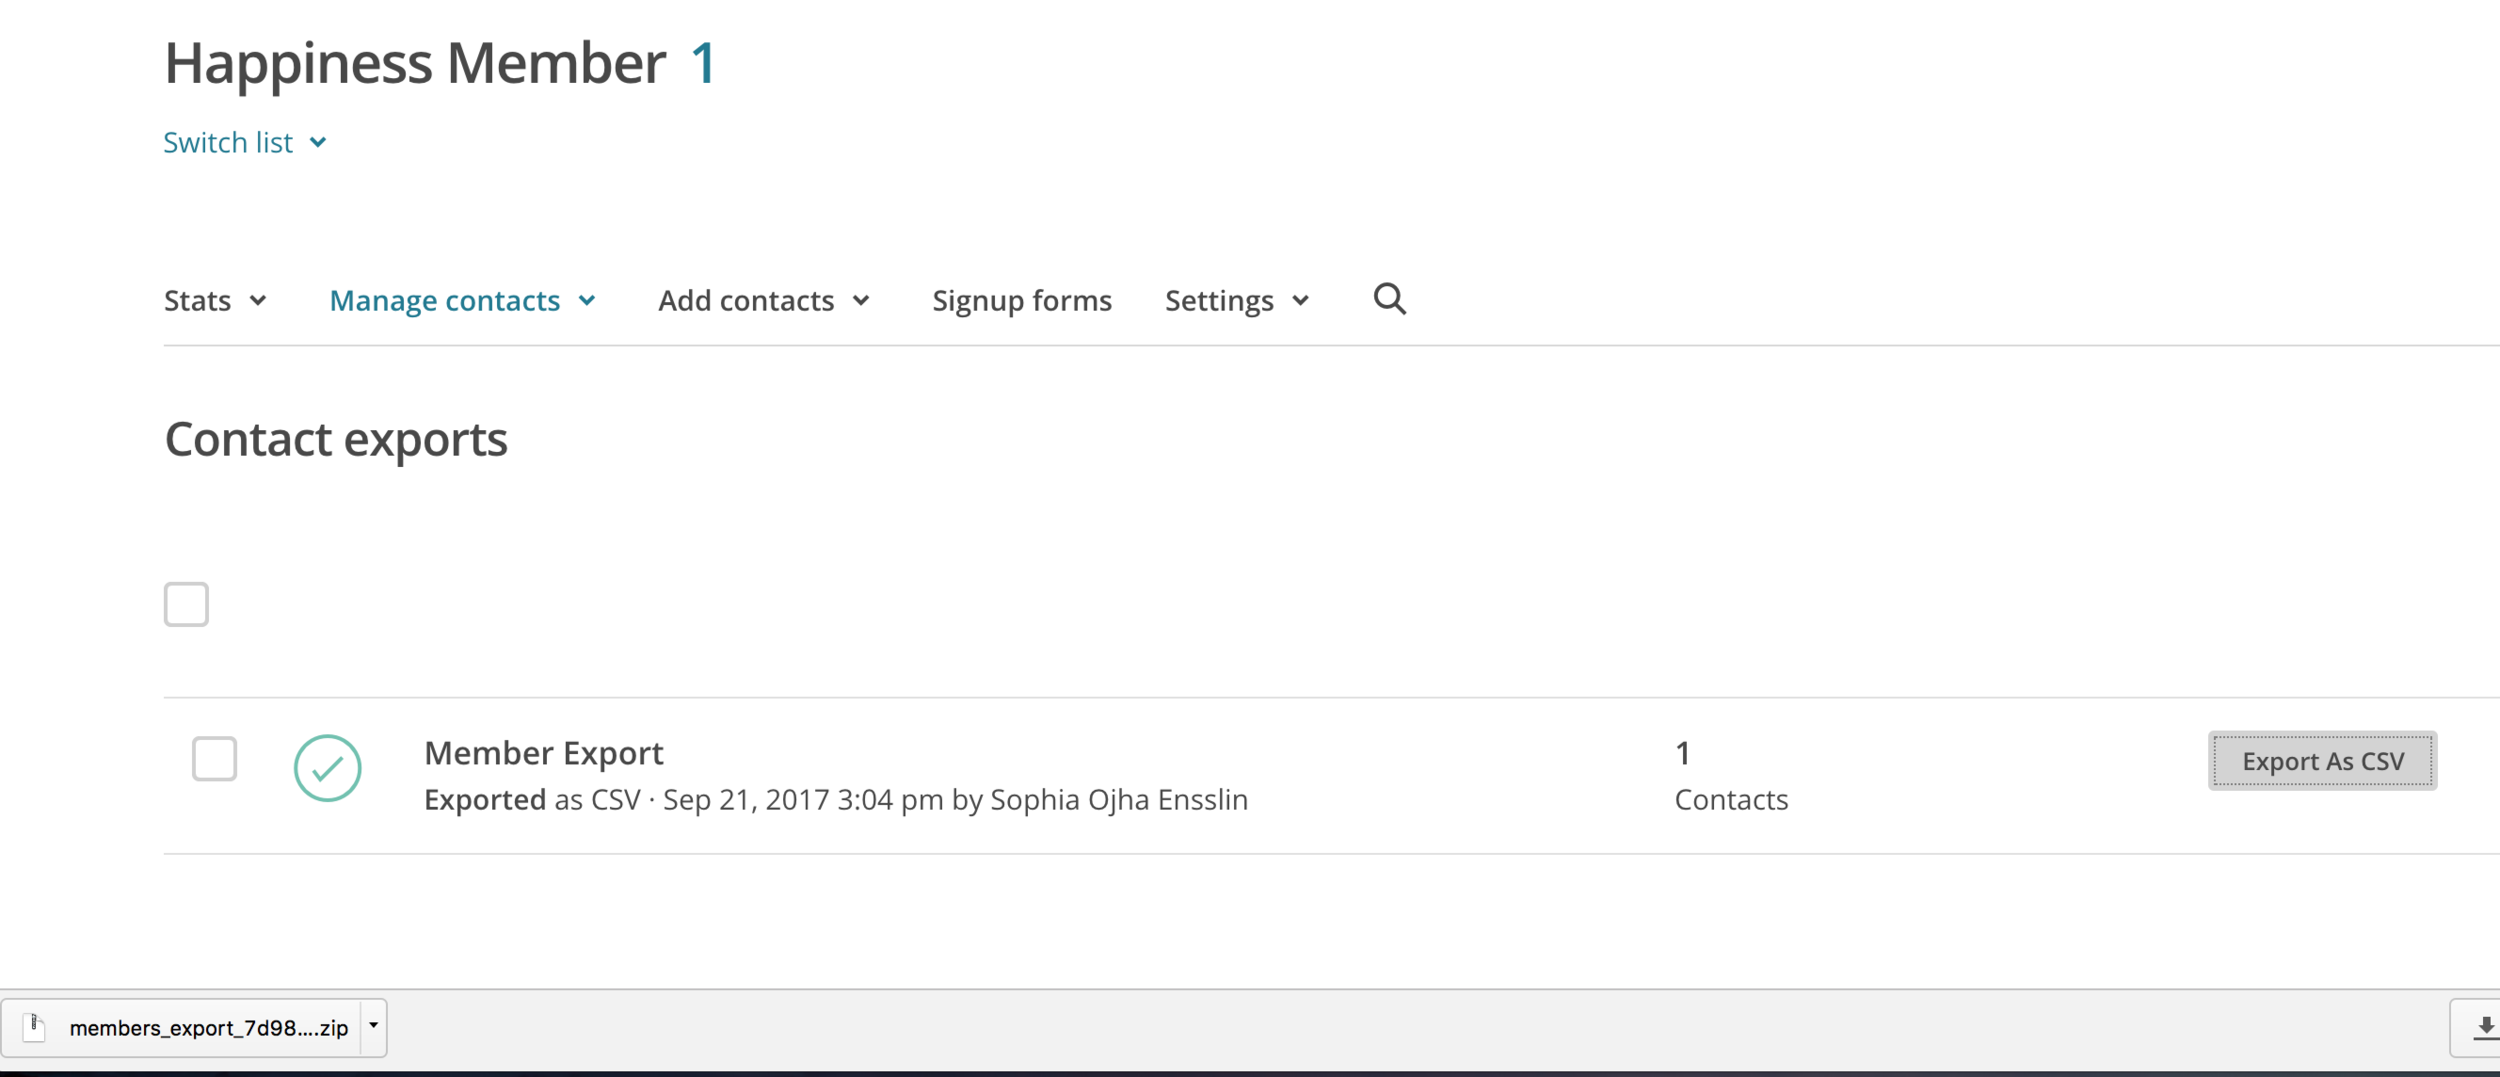
7. Now the icon changes to blue with a check mark inside.
Now you are ready to click on the grey button on the right that says "Export as CSV"

8. When you click that grey button, it will begin to download.
It will go to your "download" folder (or elsewhere if you've set it to go to a dedicate folder).
And it will show like this on the foot of your browser window as it does for me.
(I am using Chrome on a Mac. It may look differently on your system).
9. It will download as a .zip file.
Now double click on the zip icon to open it.

10. You will see the contents of the zip file show us as a list below it.
In my case, it's just one .CSV file. Yours may have more than one files listed. Look for the one starting with "subscribed". These other files that may open up containing info for for unsubscribed or bounced emails.
So make sure to look for the file that says "Subscribed_members_export..."

11. Name this .CSV file right away in your downloads folder
Especially, if you have multiple lists. This will make your life easy and the import accurate. Give it a name that corresponds to the List it contains. So in my example, I added "ListHappinessMember" at the very end of the file name.
12. In ConvertKit: Click on the grey sign called "Import subscribers".

13. This drop down will show up.

14. From the dropdown menu, check off the tag into which you want to import this List from MC.
Note you can select multiple tags if that makes sense in your email marketing game plan.
15. Drag the "Subscribed" .CSV file into the grey box on the right.

16. This is what it looks like next.
You will see these columns that need to be mapped to a corresponding field.

17. First select the corresponding fields to match Email like you can see in this screenshot.
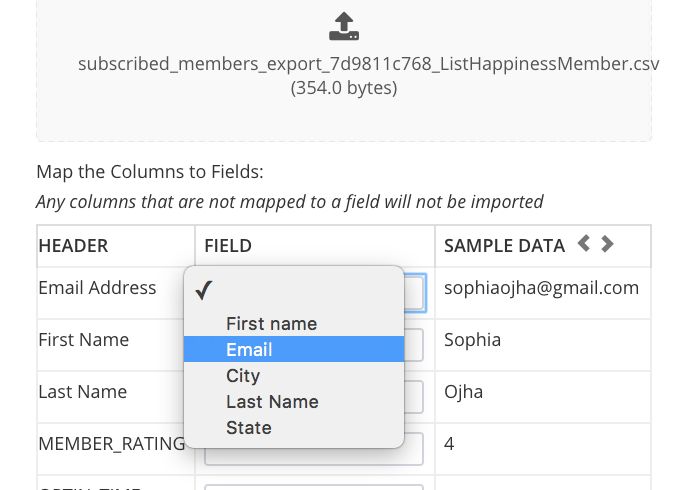
18. Next select the corresponding fields to First Name.
You can choose to leave the rest empty. If you do want the other info, you will need to create custom fields in your ConvertKit account first.

19. This is what the correctly mapped fields look like. Now click the blue "Import Subscribers" on the very very bottom.

20. Once the file is imported, this mint green bar will show up on the top of your ConvertKit dashboard telling you that the import is a success!

21. You will also get an email from ConvertKit telling you that the import is completed.

22. You are done with importing your first List! Yayy!!
Repeat this for all your lists in Mailchimp
Pro-tip and a big time saver:
I highly recommend you complete these steps for each list before moving on to the next list. This is where batch processing (or exporting all lists first) can get confusing - because when the CSV file downloads from Mailchimp, you do not see which list it belongs to. It's a garble of numbers and letters that make up the file name. Very difficult to identify!
So name the zip file and the folder inside it as soon as you download it. This will make it easy to identify the right file for the right list and you will accomplish the job faster and accurately.
That's it. Let me know how your transferring of lists went in the comments below.

Plus, if you have not done all the steps before this stage, download my free checklist to help you prep before you move to ConvertKit.
Peace,
Sophia

029: How to remove the announcement bar just from one page on Squarespace?
This one is short and sweet. On your Squarespace site, you are able to add an announcement bar on the very top. This is really nice because you can draw attention of the visitor to something that is current or most important. But how do you remove it from displaying on just a single page of your site? I show you how in this mini-video tutorial.
Hello my friend,
This one is short and sweet. On your Squarespace site, you are able to add an announcement bar on the very top. This is really nice because you can draw attention of the visitor to something that is current or most important.
It looks like this:
But what if you'd like to remove it?
In my case, the announcement bar draws attention to my live trainings. But once I get to that page (by clicking on the link in the announcement bar), I don't need that bar there.
So how do you remove it from just that page?
All you have to do is:
1. go to that particular page in your dashboard and click on settings
2. Click Advanced Settings
3. add this piece of code in the Advanced Settings:
.sqs-announcement-bar { display: none; }
4. Hit Save, Refresh the page and see the results! Done!

Watch the video below for a quick demonstration:
Love it when things are quick and simple, right? Me too! :)
Let me know if this worked for you in the comments!
Peace,
Sophia
028: How Often Should You Email Your List?
No matter what approach you take to emailing your list, one thing is clear ⏤ you must start writing to your list, regardless of the size of your list.
But how often shall I send an email to my audience?
This is a question that stumps a lot of people.
No matter what approach you take to emailing your list, one thing is clear ⏤ you must start writing to your list, regardless of the size of your list.
But how often shall I send an email to my audience?
This is a question that stumps a lot of people.
There are some online sources that say you must email your list at least once a week while others suggest emailing twice a week. Still others recommend emailing your list every other day, especially during the launch of a product.
Personally, I do not subscribe to any of the above suggestions.
The Zen Approach
My approach is different ⏤ it’s what I call the Zen approach to email marketing. In fact, I am building my entire business on the values of simplicity, compassion and inspiration from nature. So when it comes to making key decisions, I use these questions to guide me:
+ What is the simplest way of accomplishing this _________ (goal/task/solution) that makes all other ways meaningless?
+ Will taking this path be a compassionate way to serve my audience while also being compassionate to me and my team?
+ What inspiration can I draw from nature’s wisdom in solving this situation or serving my client/reader?
In other words, what is the Zen way of doing things?
Clarify Your Approach
It is time to figure out what’s the best frequency for emailing your audience in your business. If you already have a set schedule, reassess your current schedule with the following guidelines. I recommend that you take these two steps:
First:
+ figure out the three values that are core to your business. Then, based on those values, craft questions that you can use to decide on this and other such questions in your business.
Or ask yourself: what will be the simplest way for me to communicate with my audience that makes all other ways meaningless?
Second:
+ choose a frequency you can commit to
The answer you come up with may not fit the mainstream advice you get on the popular email marketing blogs. And that is exactly how it should be. The answer you come up with should match you, and be in alignment with your values. That’s the most important thing.
Because if you are doing things in alignment with your business and personal values, then you will attract an audience that is also in alignment with your business. Isn’t that what you want?
So you may come with any one of these frequencies:
weekly
twice a month
monthly
every two months
quarterly (four times a year)
Whichever you come up with, will be the right frequency for you.
Commit To This Frequency
Once you come up with the answer, make sure that you can commit to it for at least three months. If you miss during this time, just recalibrate and come back to your committed frequency. After three months, if you realize your are not making it happen, reassess what needs to change.
In Alignment With Your Values
So this approach helps you take a path that is a bit more in alignment with who you are and where you are in your journey. This is a more compassionate way to go about it. It’s more compassionate to yourself rather than just taking a cookie-cutter approach and saying to yourself, "If I am to succeed, I have to do this ⏤ even if it doesn’t resonate with me”.
The bottom line is:
If the frequency of your emails doesn’t align with who you are right now then it’s going to be a path laid out with extra obstacles. You can give it a try and see it for yourself.
Whatever you do, it must feel natural and make sense to you, your instinct and your sense of integrity. If the emailing frequency doesn’t work for you, it is not going to work for your audience because you are attracting a certain kind of audience. If anything you do feels forced, unnatural or inauthentic, the results are not going to be sustainable.
The next step is to have that frequency clearly expressed to your audience. Let them know when they sign up, in the welcome email, even at the bottom of the emails (see the bottom of my emails for one example). Again, it is essential that your audience knows what to expect.
My Zen Approach
For many months, I sporadically created blog posts and video tutorials about how to use ConvertKit and email marketing strategies ⏤ 27 posts by now (I love to count). But a few weeks ago, I asked myself some questions. I realized that to serve and attract the right audience for my business, I needed to create more useful content on my site. As a result, I committed to following a weekly schedule for publishing content on my site as well as emailing my audience.
A week seems long enough for my reader to digest and implement new content that can truly help them. This way each week my audience (that’s you!) can implement one more piece in their business with my help.
On top of that, I have also come to realize that the old adage “practice makes perfect” is really powerful. I know that the more content I put out, the better I get. So, for me ⏤ choosing a weekly schedule of emailing my list makes complete sense. Not because the gurus of email marketing say so. But because if fits my business goals and business values and something I felt I can commit to.
Different Approaches
Different approaches work for different people because it works for the content creator and their audience knows clearly what to expect.
Blogging and your online business should not become another thing that causes stress and upset in your life. It should be a source of joy and peace and contentment and a way to create value in the life and business of others. Not the other way around.
So tell me:
What are you business values and how frequently will you email your list?
Share with me in the comments!
Warmly,
Sophia
027: ConvertKit's New Visual Automation - What's the buzz?
In June 2017, ConvertKit announced at the Craft + Commerce Conference that they would release a new feature - the visual automation. Everyone oohed and aahed as the audience gasped (yes, I was one of the nerds getting excited to see the demo). So what's the buzz about? Here's my take...
In June 2017, ConvertKit announced at the Craft + Commerce Conference that they would release a new feature - the visual automation. Everyone oohed and aahed as the audience gasped (yes, I was one of the nerds getting excited to see the demo).
The Time Line of Release
August 1st - Beta Testing to the first 6 and more (yes, I was one of the 6 - yayyy!)
August 22nd - First 1000 customers receive access
September 5th - All ConvertKit Customers get access
So what's all the buzz about?
Well, one of the contentions that a lot of people had about ConvertKit was that there was no visual way of setting up the funnels like in other platforms like Active Campaign, Infusionsoft, Drip and Mailterlite. ConvertKit's team was fully aware of this and was working hard to create a feature that would do the visual automation better.
Why Sending Targeted Content is Important?
If you want to see a demo of what Visual Automation looks like, then definitely make time for my live video training on Sept 28th to show you my dashboard. But in short, with visual automations, you can customize the journey your subscriber takes within your funnels in a highly visual way.
You can still scribble the funnel on a piece of paper but now you will be able to do this right inside your ConvertKit account. With great ease you can connect events, actions and conditions (more on that in the live training). And you can even edit sequences and forms from right within the visual automation/editor!! (This is what made me gasp when Nathan demonstrated this at the June Conference - yes, it's that good!).
Visual Automations will make you ooh-aah in delight!
Not only will this make funnel building easy, you will also be able to track how well your content is doing. You can see at a glance how your audience is responding to the materials you are sending them.
There's only one way to say this: this is a game changer. I know, I know, how cliched!. Nathan Barry, the founder of ConvertKit calls the new visual automation, "the most substantial product update in our history." And I'd like to show you what this automation looks like on the inside.
Sign up for the next Live Training:
When: 2pm EST, Sept 28th, 2017 Thursday
What: Live One Hour Training - Basics of the New Visual Automation Feature in ConvertKit
On Thursday Sept 28th, I am holding a free live training (no pitch) on the new Visual Automation Feature in ConvertKit. I will be showing you how you can send specific content to subscribers within a specific tag and how to send them something else if they don't have that specific tag.
I will also explain the difference between Event, Action and Condition - the three pillars that you will be building your funnels on. This way you can pitch something only to those who are yet to become customers and spare your existing customers from the sales talk - and in this way send very targeted content to your audience.
If you'd like to learn how to do all that, this training is for you. You can also ask me questions live and see if I can answer them!
What can Visual Automation be useful for?
You can use the visual automation for all the things you are already doing in your account. But if you are not fully optimizing the use of your ConvertKit account, then Visual Automations can help you.
You can do all of this with ease:
Build out a Welcome Sequence
Create a Sales Sequence only for non-customers
Add subscribers from different forms into a single sequence
You can create a Webinar sequence - pre and post webinar
You can create surveys inside your welcome email and tag people according to their responses
If you are currently in the process of building out any of these, let me know. If possible, I will do a live demo for you to implement in your business. You will also get a recording so you can watch and work!
As always write me your questions in the comments below.
Peace,
Sophia
![026: How to remove date on Squarespace blog posts [Hayden or Pacific Templates]](https://images.squarespace-cdn.com/content/v1/63921a08c456116377cc3381/1713295156348-GY5165RLRYPIJH7YZM90/image-asset.jpeg)
026: How to remove date on Squarespace blog posts [Hayden or Pacific Templates]
Here's a quick tip on how to remove the date feature on your blog in Squarespace (templates Hayden and Pacific).
Hello there, my friend!
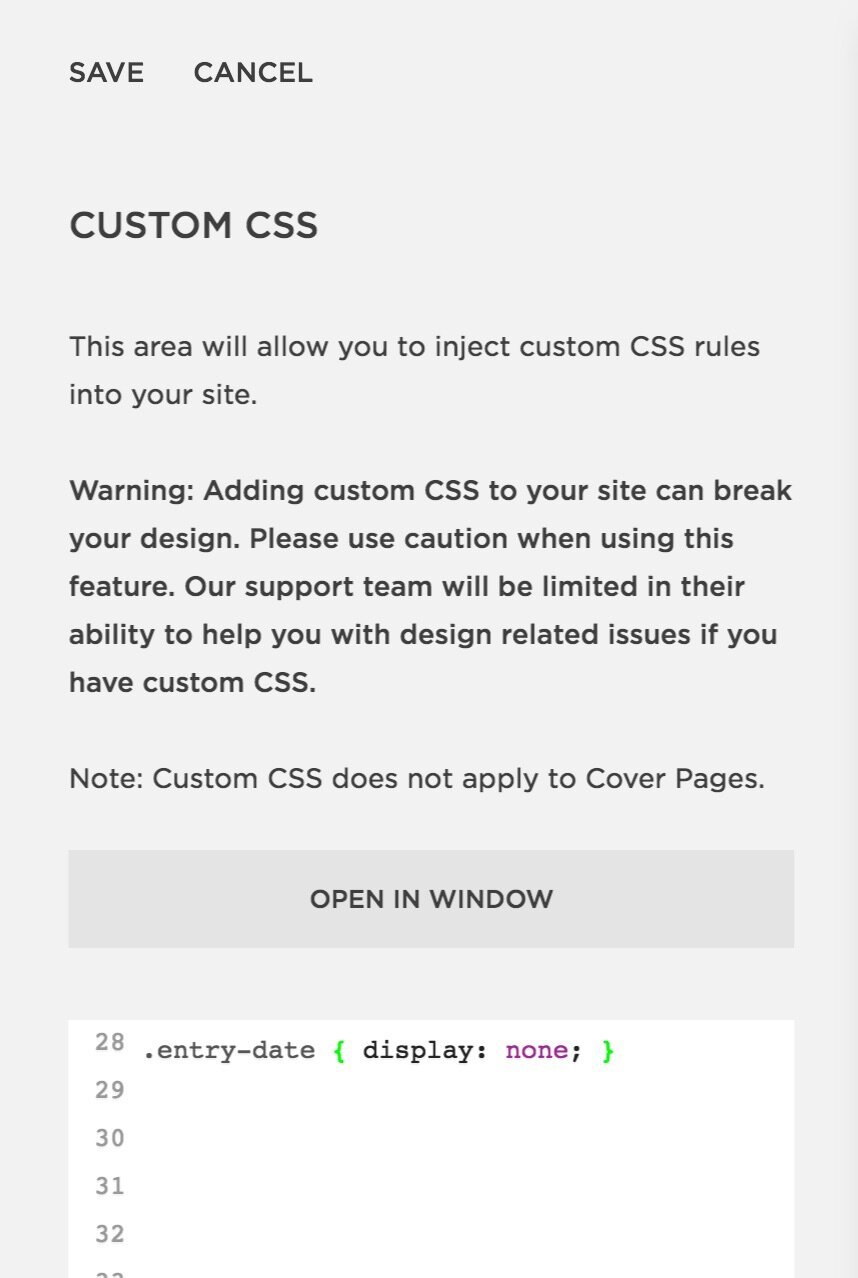
Here's a quick tip on how to remove the date feature on your blog in Squarespace (templates Hayden and Pacific).
Go into Design -> Custom CSS
and add in this piece of code:
.entry-date { display: none; }
Watch the short video tutorial to see how I do it:
Hope this has been helpful. Thank you for watching!
Sophia

025: The Power of Daily - What I learned from Sean McCabe
What I learned from Sean McCabe at the Craft + Commerce Conference?
The moment he showed a graph of his income, I knew that I had to start writing daily.
What I learned from Sean McCabe at the Craft + Commerce Conference?
The moment he showed a graph of his income, I knew that I had to start writing daily.
Sean McCabe had one message and one message only during this speech at the 2017 Craft and Commerce Conference: start writing and start writing daily. On a graph showing his income, he circled the point where his revenue sky-rocketed. It was when he made it a daily habit to write that his revenue from his online business really broke the trajectory and took off!
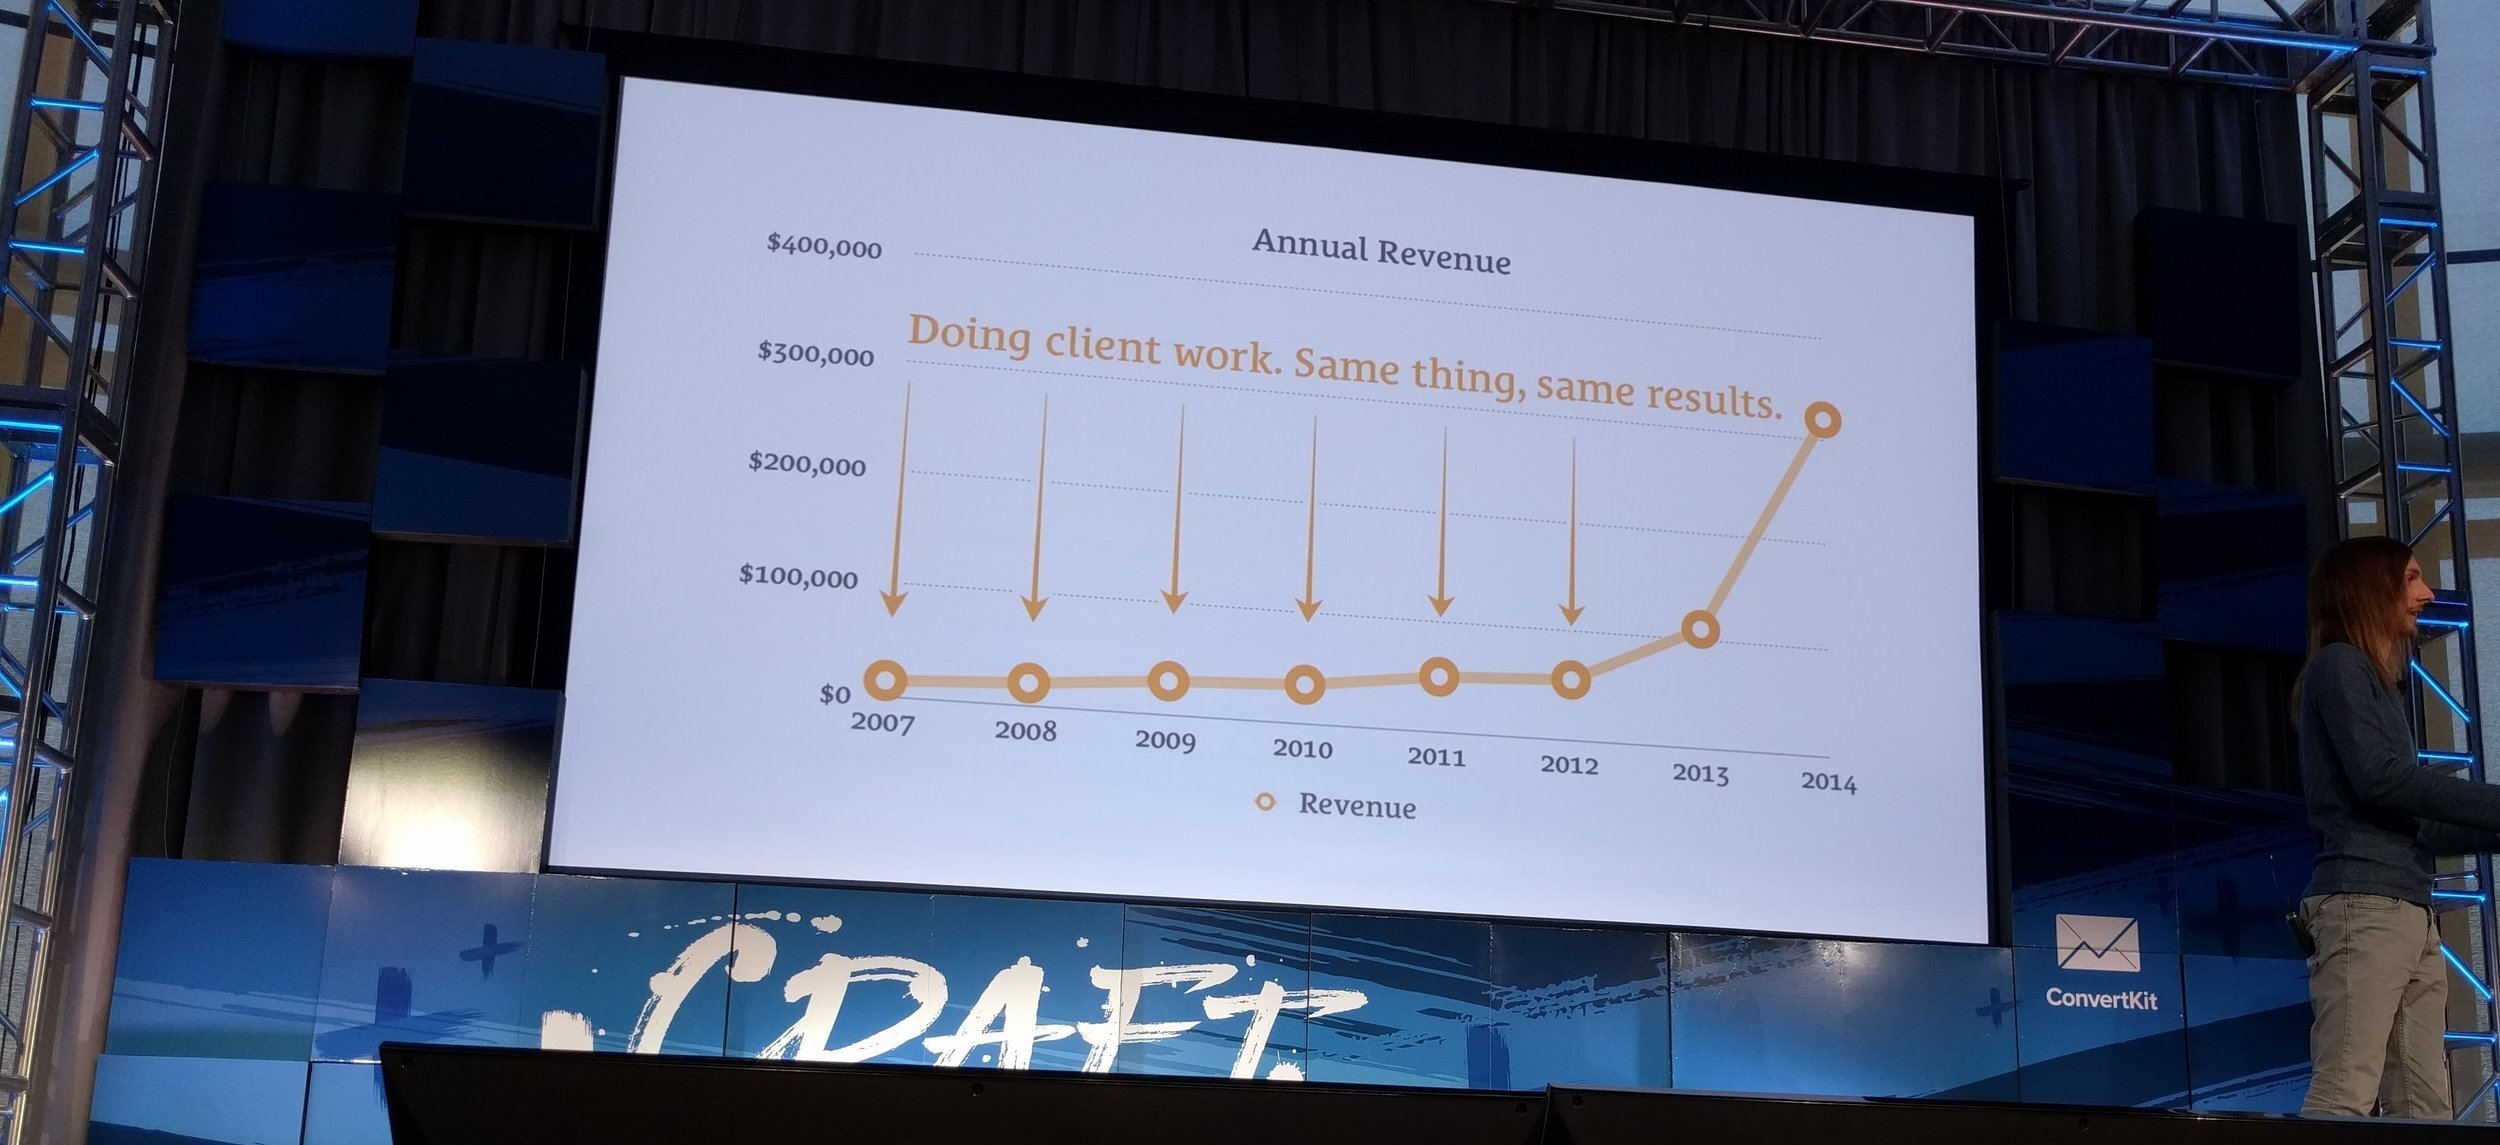
His revenue increased dramatically when he began to write daily.
Sean shared that as he began to publish more and more content, his income shot through the roof. It was truly eye-opening!

The point at which his revenue increased - the moment he began writing consistently.
I think that this was all that I needed to see. I’ve been working to make a living online for several years and right now I am really grateful to have consistent, repeat clients in my service-based business. Working with my clients helping to build what they aspire to create fills me up with contentment. Everytime I can solve a tech problem for them or implement their ideas into their ConvertKit accounts, I receive a huge sense of contribution and self-worth. But I know that I want to do more for my clients and readers that is leveraged. I want to create a massive resource of information in the form of blogs, video tutorials and online programs that will have the useful resources that online entrepreneurs can use to implement email marketing strategies and grow their business.
But I know that at the pace at which I am going, it is not sustainable. I am heading towards burnout. I know I need to change something.
And that change is the writing practice.

In the day-to-day busy schedule of serving various clients, writing a blog or creating a video tutorial gets pushed back on my schedule. But it is exactly this kind of an activity that can help my online presence become a resource for bloggers. My goal is to show bloggers how they can make a living and thrive using email marketing. So for that to happen, I’ve got to “Teach Everything I Know” (ConvertKit’s motto). And if I am to do that, I’ve got to make writing a daily habit.
The logic is very clear and convincing:
Help Online Entrepreneurs -> Teach everything I know-> Write Everyday

Sean highlighted in his talk how writing is the basis of anything you want to create. You start with writing if you want to:
write a blog post
make a video script
draft a speech
create a proposal as a freelancer or agency
apply for a job
make a real estate offer
write a birthday/anniversary/wedding wish
communicate with clients
ask for a raise
write a book
write a song
create a movie screenplay
journal your thoughts
write gratitude
draft a fundraising proposal
write emails to your list
As you see in my list above, writing is the basis for all personal as well as professional communication and so many types of creative activities.
Why not, then, invest our time to hone this craft?
Let’s say with this blog post and Sean’s arguments, you are convinced that you too want to write everyday. But it’s not easy to say, okay from tomorrow I will begin writing.
You can certainly do it.
But it’s far easier to cross a narrow bridge when it has hand rails than it is to walk on a bare plank across a divide.
That’s why Sean offered everyone attending the conference free access to his course: 30 Days to Better Writing. (This is not an affiliate link). I signed up and have been writing daily for the last 7 days.
Including this article, I have written 4177 words in 7 days.
(And that’s in about 20 minutes daily - on some days I wrote for 40 minutes or more)
30 Days to Better Writing
His course is a real inspiration for building my writing habit. He asks us to write for 20 minutes everyday. He has an exercise and writing prompt in each lesson. And that makes it super easy to begin writing. What I love about his course is that each lesson builds upon the other and it is directed towards you as a blogger working to make writing a daily habit.
If you’d like to take advantage of this course, here’s where you can find more info: 30 Days to Better Writing.
Key Insights That I took away from his talk:
Building a writing habit is the best thing you can do for your career.
If you want to make a name for yourself write daily.
It all starts with writing
You write to find out what you want to say
Nothing you write is wrong. Write first. Edit later.
Leaders are seen as experts because they teach.
Get inside the weekly cycle (about posting weekly blogs).
Get a content buffer (6 weeks of buffer if you publish weekly and 2 weeks if you publish daily)
Repurpose your content. Replay your best hits.

This is me - very happy to be in the audience, getting inspired!
The conference held in Boise, Idaho was truly a success for me. I’ve come back with enormous treasures and gifts on my journey as a blogger and online entrepreneur. And one of them is the gift of how to make writing a daily habit.
Thank you Sean McCabe! Thank you Nathan Barry, the entire team at ConvertKit and all the participants who made the conference possible.
If you'd like to join next year's conference, here's the link to sign up to the list so you get updated on ticket sales: https://convertkit.com/conference/
I've already got my tickets!
Question for Reflection: How do you think building a daily writing habit could help you in your business and life? What are the two or three obstacles you’d need to overcome to write daily? And finally, will you choose to write daily today?
Please share in the comments below as your sharing can inspire someone - (starting with me).

024: How to Create Multiple ConvertKit Forms on My Squarespace Page?
I took the cue from a facebook question to create a video tutorial showing you how to have three different ConvertKit form pop up from a button on the same page AND do this without Zapier.
Yes, you heard that right! Without using Zapier! And there's a detailed step-by-step video in the blog as well.
Hello there, my friend!
This is one of my first hurdles that I faced in Spring 2016 while setting up ConvertKit forms on my personal development website. I wanted to add three different ConvertKit forms to my homepage, each with a unique free download (also called content upgrade or lead magnet). Eventually I figured it out and have been wanting to make a video tutorial to show you as well.
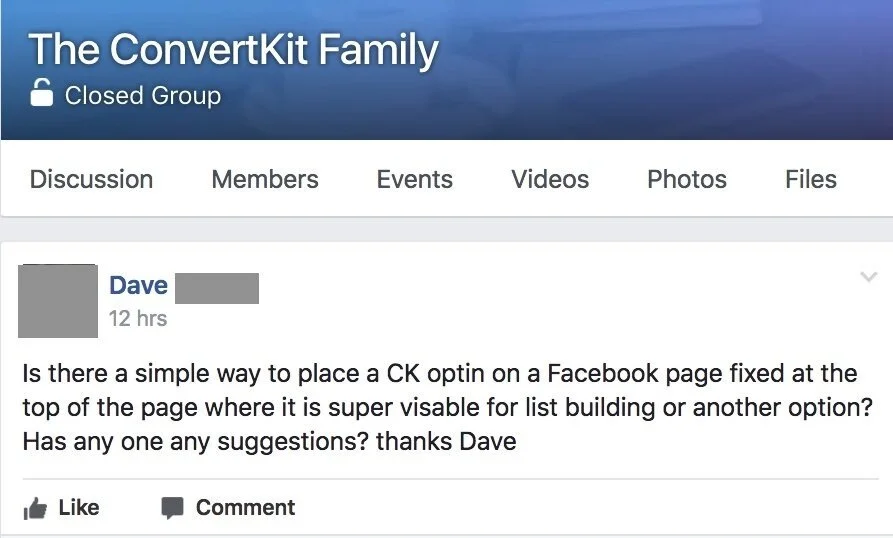
Then, today in the ConvertKit Family Facebook, this question came up again:
".... I am creating a Resource page with different content upgrades... I'd LOVE for the ConvertKit form to pop-up on a button click...Has anyone does this?"
So I took that as my cue to create a video tutorial showing you how to have three different ConvertKit form pop up from a button on the same page AND do this without Zapier.
Yes, you heard that right! Without using Zapier!
Here's a video showing you step-by-step. But below you can also see an outline of all the steps:
Step 1:
Create your resource page with the three Content Upgrades (or more if you like)
It can look something like this:

Step 2:
Add the following piece of code under Design-> CSS on your Squarespace account:
/* CTA Button */
#cta-button-container {
text-align: center !important;
line-height: 3em;
margin-top: 30px;
margin-bottom: 30px;
}
#cta-button {
text-align: center !important;
background-color: #111111;
padding: 10px 15px;
padding-right: 15px !important;
color: #fff;
font-size: 14px;
text-transform: uppercase;
letter-spacing: 2px;
font-weight: 600;
display: inline-block;
}
#cta-button:hover {
background-color: #111111;
border: 2px #111111 solid;
color: #fff;
}
Step 3:
Customize the button colors above to match your brand color. You will see the color codes that I've made bold above. This is what you will need to change. To find out your button color code, go into Design and look for the button color there.
Step 4:
Create 3 different ConvertKit Forms. Make sure you have customized them (with the right freebie, tag/automation, sequence and so on). Make sure all three ConvertKit Forms you are using are MODAL forms.
All three of them must be MODAL forms. This is because you want them to popup from a button. (Modal means they will pop-up while inline means they stay on the page).
Like this in the picture below:
Step 5:
Add this bit of code under each content upgrade on your Squarespace page:
<div class="sqs-block-button-container--center"
id="cta-button-container">
<a rel="ck_modal" href="#ck_modal"
class="sqs-block-button-element--medium sqs-block-button-element" id="cta-button">
Download Here!
</a>
</div>
<p style="clear:both;">
</p>
So in other words, you will place the above code under each of the images on your resource page so it should visually look like this:

Step 6: Add the three ConvertKit Form Codes individually
Now we will make grab code from the three different ConvertKit forms and place them very delicately. Please watch the video if my text here is not making sense. Sometimes showing these things is easier than explaining in words for me.
Step 6.1: Resource # 1 - the First ConvertKit Form
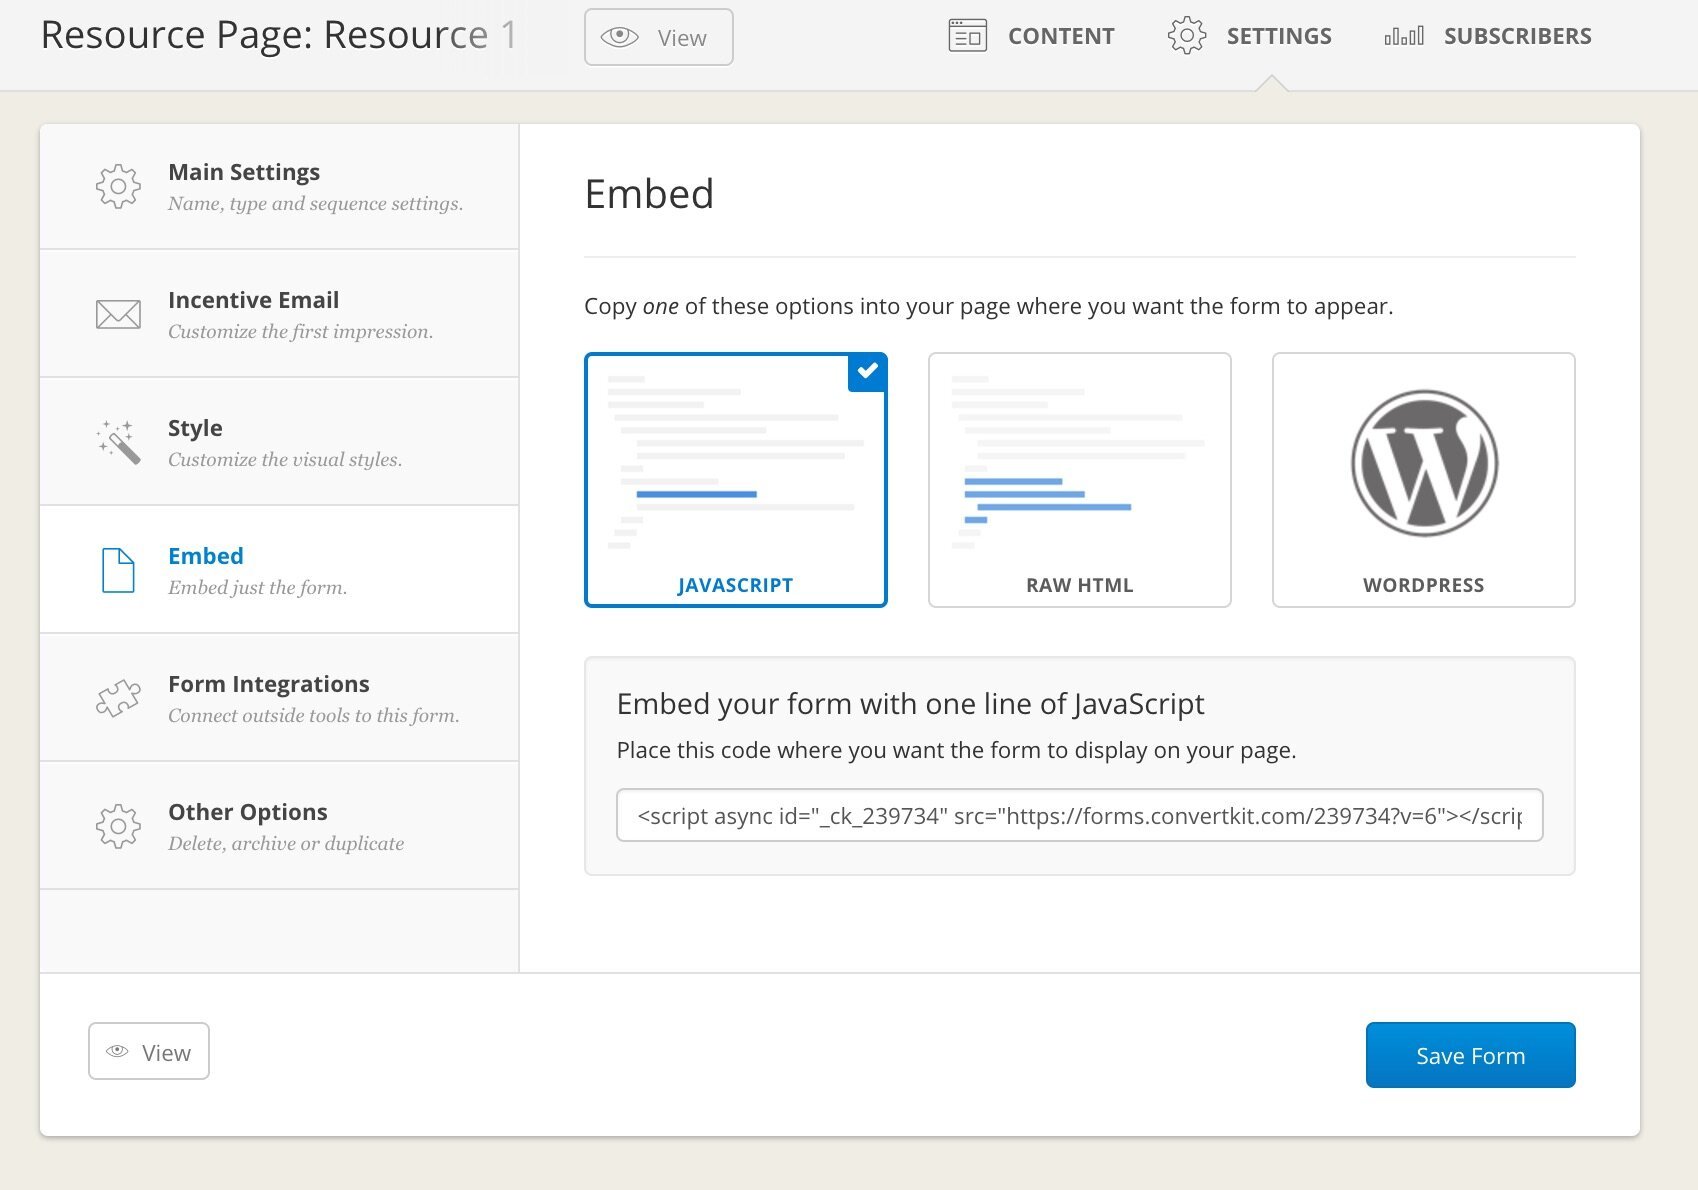
Just copy the Java script and place it above the existing code. That's it. This is the easiest. You get that from EMBED section of your Form:
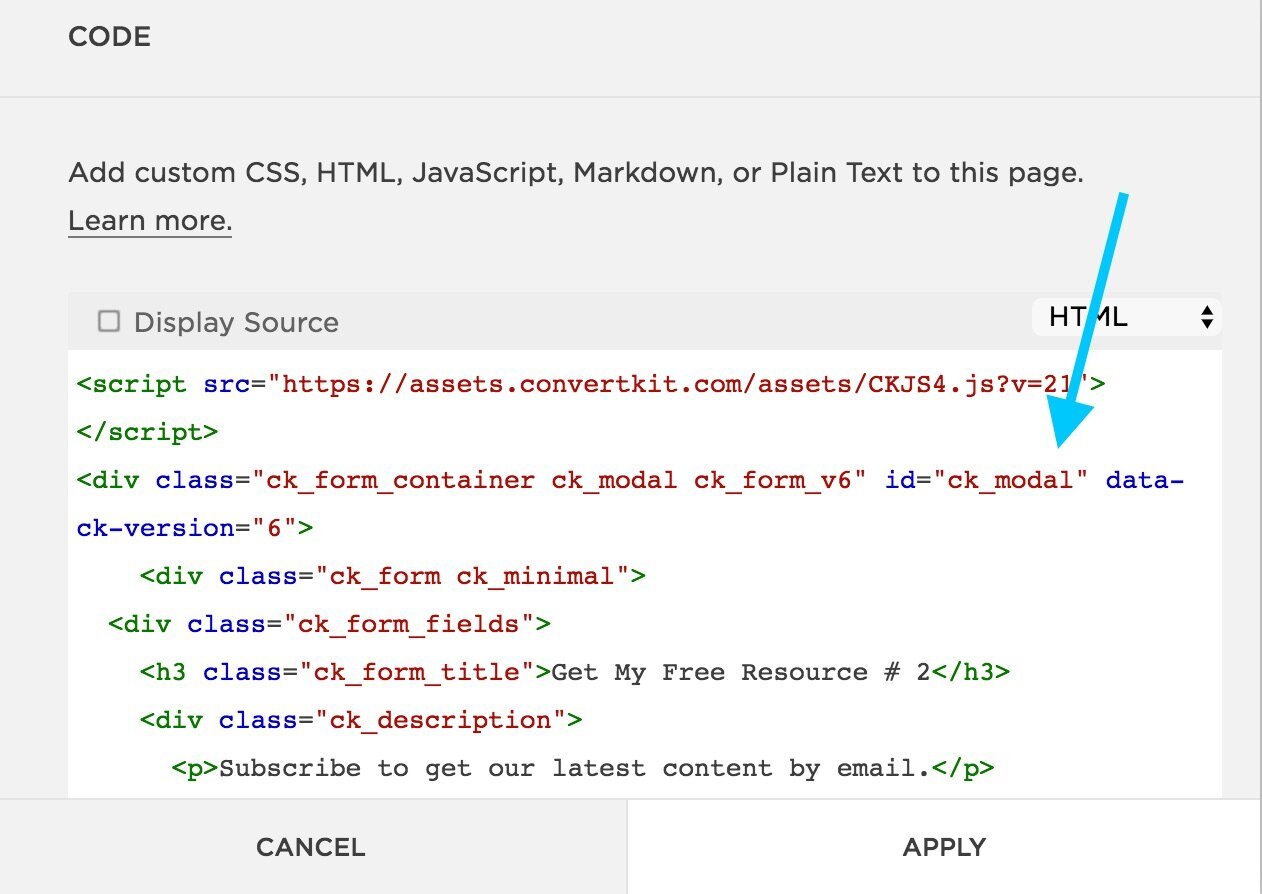
Step 6.2: Resource # 2 - the Second ConvertKit Form
For the second and the third ConvertKit Forms, you will grab the HTML code. You will also get that from EMBED section of your Form. But instead of Javascript, click on HTML.
Just copy all the HTML code and place it on your squarespace page where you already have some code in the code block. See the image below for a visual reference.

Step 6.3: Resource # 3 - the Third ConvertKit Form
Do exactly the same thing as in Step 6.2 for the third ConvertKit Form.
Just copy all the HTML code and place it on your squarespace page where you already have some code in the code block.
Step 7: Customize the Second and Third ConvertKit Form
Now this is where you will need to pull up your detail-oriented, laser-focus. Because now we will go into the Raw HTML that we just posted in the second and the third resource form, and customize it.
You are now doing this inside the code block on squarespace. This is where I will be making the corrections to the code.

Okay so now, you will change three parts in the code:
rel
href
id
Follow the steps below to see what I mean. (Watch video above if that is easier to follow).
Step 7.1 Let's start with Form No. 2
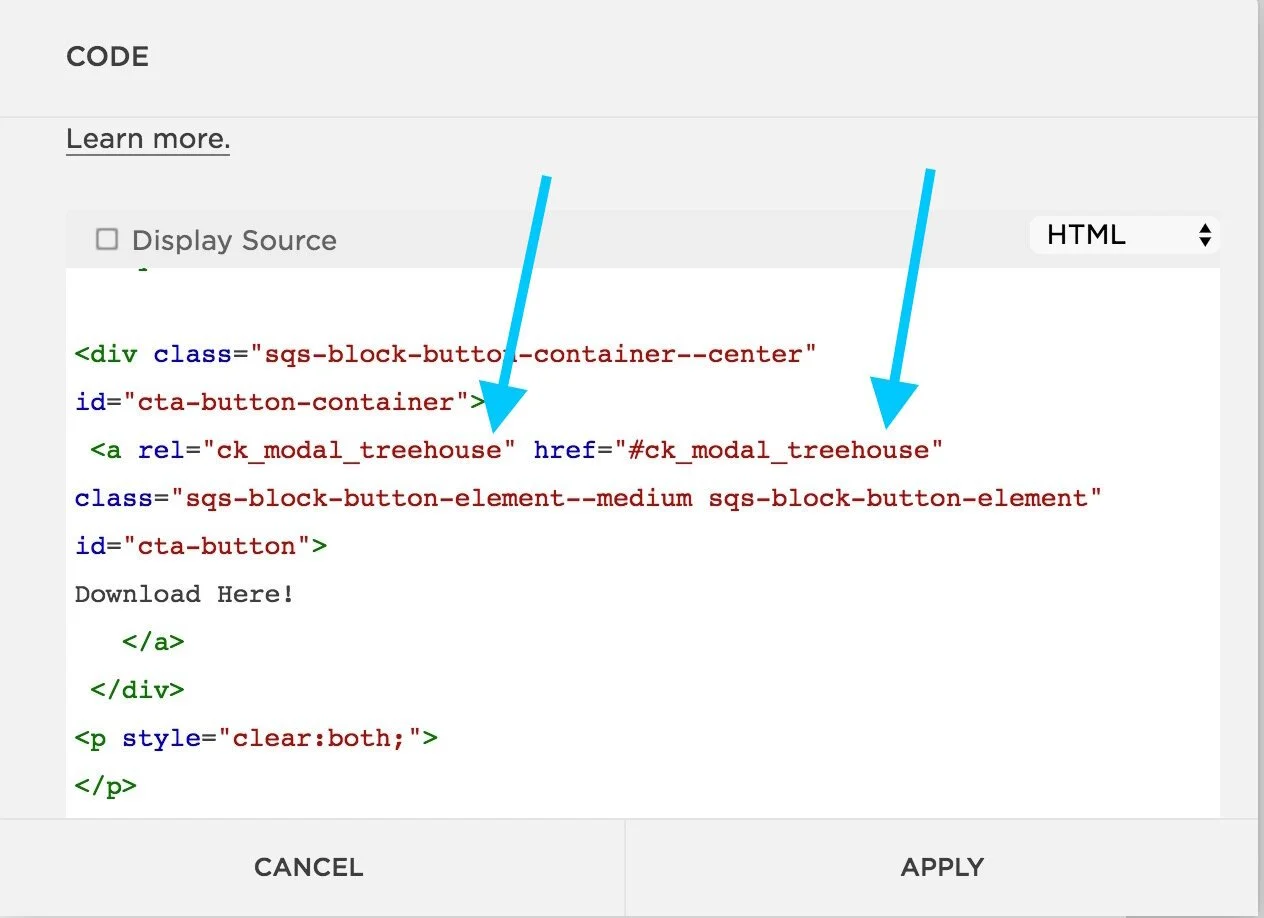
In simple words, what we want to do is to give a suffix to the modal forms so that Squarespace can tell the difference from one form to the other. This suffix will be added at the end in the three places. And it can be any term as long as it is the same in the three places.
First find this bit of code at the very top. You are looking for the form id. Then add any suffix you like. In my case I am adding "treehouse".
This is the code before
This is the code with the suffix added
Now scroll to the very very bottom. Find <a rel="ck_modal" href="#ck_modal"
And also add the same suffix there.
This is the code before

This is the code with the suffix added
Step 7.2 Make sure to do the same actions in Step 7.1 for the third convertKit form. Just make sure you use a suffix that is different than what you used in the second form. I used "bigcat" for my third form - just because!
Step 8: Test!
Now make sure to test everything. There are a lot of pieces to this, so don't worry if it is not working the first time. There may be a tiny detail that you need to tweak and you will get it.
If after testing it and trying it out, you still can't seem to make it work, just drop me a line in the comments. I will be happy to help troubleshoot - my gift to you.
I want to thank my colleague Melissa Thorpe who taught me a huge part of the multiple optin form process and I also thanks Tors Grantham for teaching me how to make the button pop-up on Squarespace. You see, we are all constantly being helped! THank you for watching/reading this blog and be sure to share it.
PS: This blog post can be freely shared on social media. If you'd like to share it to with your readers inside a paid platform as a resource - please drop me an email to see what to write in giving credit!
My cat didn't come home last night.
How my kitten's absence made me realize my own suffering, the cause of my suffering, the end of my suffering and the path leading to its end.
Lola, our 3.5 month old kitten went outside yesterday afternoon with all her brothers and sisters and her mama. They all returned but she has yet to come back. It is now the next morning 4 am.
She is the youngest and the smallest and the cutest of them all.
She has missed her dinner.
I miss her. I kept listening all night to any sound on the door to see if she was back. I called out for her.
Clearly, I am attached. And I know that attachment is one of the root causes of suffering according to Buddhist thought. I am suffering.
Something happens in life. We don’t like it. We want it to be different than it is. We want it to be like we want it to be. And when it is not, we suffer. We are sad, angry, upset, restless and overall feel not so peaceful and content.
This is dukka or suffering. It is also the First Noble Truth. There is suffering in this world. I am suffering because my kitten is not home and I want her to be home. I am suffering because of my attachment to the good feeling I have when my kitten is home with me.
Do you know how this feels? Is there something you are suffering about?
While I am not at ease and sad, I also know in my heart that there must be a way out of this. First I know that things change. Nothing is constant. There is impermanence. Could this fact of life be my lifesaver? My refuge from my own pain?
Impermanence means that whatever I am going through is not going to stay this way for all time. The intensity of what I feel may change and even slowly dissipate. I may overcome this situation and find access to peace and even to joy and laughter again.
So that flicker of hope already helps me in seeing the bigger picture.
That means whatever is going on, there is a root cause for it. The cause is inside my mind. The thoughts, the reactions, the sensations that emerge in response to the things in the world are part of the root cause of suffering. So that means, if I remove the causes, I can remove suffering.
That’s the Second Noble Truth. There are certain things that cause my suffering.
So how do I deal with these causes of suffering. I must stop these causes that are inside my mind. I must learn to train my mind which is best done through meditation. In meditation, I can train my mind to simply observe. This is a ray of sunshine right now in the middle of my suffering - my yearning for my kitten to return home, my sadness emerging from her absence, my fear of her being in trouble without help, my desire for her to not suffer, my desire for her wellbeing at all times and not knowing if she is well, my inability to help her in case she needs my help - all root causes of my suffering.
But there is a way out.
There is a way out of suffering. That’s the Fourth Noble Truth. There is a solution to it. We CAN dissolve suffering and pain. There is a way out of this.
Does that give you a sense of hope as well? Whatever you are going through, there is a way out of it. It is not permanent and you can do something to change it.
So that means, I can take steps to help myself out of my own suffering. By observing and accepting what what I am feeling, I can dissolve it. By not having craving and not having aversion towards it.
I have to learn how to not crave things - in my case, how to not strongly want Lola to be back home.
I have to learn how to not have aversion to things, in my case, how not to dislike that she has not returned.
No craving, no aversion.
Does that mean I must walk around like a feelingless ball of rock?
No.
It means I must learn how to deal with reality again. I must learn how to accept life first. I must learn how to be fine with what is. And this comes from not believing all my thoughts. Accepting my feelings and my situation as they are without judging them as bad.
By observing my breath. Specifically speaking, observing how the breath touches the area above the upper lip and below the nose. If I can just observe that area and how the incoming and outgoing breath touch it, I can help myself out of craving. This is one of the practices that the Buddha taught and the main practice that Webu Sayadaw, the Burmese Monk of high stature who was thought to be enlightened, taught.
When I am focussing on the area above my upper lip and below the nostrils, I can feel my mind slowly calm down. It is like a wild, turbulent ocean with big waves going everywhere, calming down slowly and become a serene, peaceful body of water with undulating waves making a soothing sound as they roll across the beach.
When I observe my breath and how it touches that area, I notice that my breath slows down. I take softer and softer breaths. I feel a wave of calm.
When I observe my breath and how the incoming breath and outgoing breath touch the area below my nose and above the upper lip, I feel my body slowly dissolves. I feel vibrations, very gentle sensations at times, at times heaviness in my legs, at times I feel I am floating and without a body. But for this, my body is sitting upright, without any movement - very very still.
These are moments of extreme peace and contentment.
This is the Third Noble Truth. Nibbana, the cessation of suffering.
This is the outline, a script, a recipe, a formula for getting out of suffering and being at peace that the Buddha gave us 2500 years ago. It is not about believing in a God or following a religion. It is about a practical solution to our every day human condition - suffering and coming out of suffering.
Right now, my kitten is not home still. It is 4:49 am the day after she went for a walk. I hope she is resting under some bushes in the forest behind our home. I hope that she will be back home. But right now, I am fine. I know that this is not permanent. I know that this too shall pass.
All I can do is observe my breath. I will do that now. Will you join me?
Update: The little kitten, Lola, came frolicking back home later that same day and began playing with her sister and brothers! As if she had never left :-)
023: How to Create A Custom Opt-Out link (Path 2: Custom Template)
In ConvertKit, there's one unsubscribe link. It is at the very bottom of your email in the footer.
And there's really no way to have your subscribers update their preferences. So what if you have a launch sequence or a free email course sequence and you want to give your audience to opt-out just from those emails. But still stay on your list. What do you do?
You create a Custom Opt-out Link.
Yes, the answer to that question is that you'd create a custom opt-out link. But before I show you how to create that op-out link, we need to know where do you place it. Because the steps on how to create that opt-out link will depending on where you want to place it.
There are two places you can choose to place your custom opt-out link:
Path 1. Simple & Easy: In side every email in your sequence
You just place it next to your signature or somewhere at the end of the email. But then you'd have to do this for each email in that sequence.
Path 2. A bit more involved: in the footer of a custom email template
When you put in the custom email template, then it shows up in the footer of all the emails that use this custom template - making it automatic; no need for you add it again and again. For this second option, you'd have slightly more steps involved but it's doable. Just follow along. And if questions arise, do share them with me in the comments.
Decided which path you want to follow?
Now follow along these steps below or watch the video to create your very own custom unsubscribe link.
For Path 1, see Video 022 here.
Path 2. Adding the Opt-out Link inside a Custom Email Template
If you go for this route, then know that this opt-out link will show up in the footer of any email which has your custom template activated. It builds upon the steps I showed you for option 1 above. These are the steps:
a. Create a Thank You Page
b. Create a Tag
c. Create a Link Trigger (Watch video: 001 on link triggers if you'd like to refresh your understanding of what they are)
d. Create a Custom Template (or use a custom template you already have)
e. <a href="https://www.sophiaojha.com/preferences-updated" trigger-id="216785"> Opt-out </a> of Gardening 101 only or
<a href="{{ unsubscribe_url }}"> unsubscribe from everything </a>| {{ address }}
f. Customize the above:
+ add the right thank you page link to replace: "https://www.sophiaojha.com/preferences-updated"
+ add the right trigger-id
(which you can find by adding your link trigger to a sample sequence email. Then click the <> html view in that sample email and then Grab the trigger code behind the link trigger)
+ and customize the text that goes to replace this: of Gardening 101 only or
g. Activate this custom template for your email sequence or broadcast.
k. Do a happy dance in celebration! :-)
Watch the video below to follow along.
For Path 1, see Video 022 here.
I hope that you will use one of these two options to give your audience a chance to opt-out of certain kinds of emails. Do give it a try and always feel free to write me your follow-up questions in the comments below.
Peace!
Sophia
Note: This is not for replacing your unsubscribe link. That would be breaking anti-spam laws. So we will leave that unsubscribe link alone. We are just adding another "opt-out" link for removing someone from a particular type of email we are sending out in addition to the official unsubscribe link.
022: How to Create A Custom Opt-out Link in Your Email (Path 1: Within Each Email)
In ConvertKit, there's one unsubscribe link. It is at the very bottom of your email in the footer.
And there's really no way to have your subscribers update their preferences. So what if you have a launch sequence or a free email course sequence and you want to give your audience to opt-out just from those emails. But still stay on your list. What do you do?
You create a Custom Opt-out Link.
Yes, the answer to that question is that you'd create a custom opt-out link. But before I show you how to create that op-out link, we need to know where do you place it. Because the steps on how to create that opt-out link will depending on where you want to place it.
There are two places you can choose to place your custom opt-out link:
Path 1. Simple & Easy: In side every email in your sequence
You just place it next to your signature or somewhere at the end of the email. But then you'd have to do this for each email in that sequence.
Path 2. A bit more involved: in the footer of a custom email template
When you put in the custom email template, then it shows up in the footer of all the emails that use this custom template - making it automatic; no need for you add it again and again. For this second option, you'd have slightly more steps involved but it's doable. Just follow along. And if questions arise, do share them with me in the comments.
Decided which path you want to follow?
Now follow along these steps below or watch the video to create your very own custom unsubscribe link.
For Path 2, see Video 023 here.
Path 1. Adding the Opt-out Link inside Every Email in your Sequence
If you go for this option then note that you will have to add the link in every email of the sequence. But the steps are simple.
a. Create a Thank You Page
b. Create a Tag
c. Create a Link Trigger (Watch video: 001 on link triggers if you'd like to refresh your understanding of what they are)
d. Add it into your email.
Watch the video to see how to do this. (Coming soon!)
For Path 2, see Video 023 here.
I hope that you will use one of these two options to give your audience a chance to opt-out of certain kinds of emails. Do give it a try and always feel free to write me your follow-up questions in the comments below.
Peace!
Sophia
Note: This is not for replacing your unsubscribe link. That would be breaking anti-spam laws. So we will leave that unsubscribe link alone. We are just adding another "opt-out" link for removing someone from a particular type of email we are sending out in addition to the official unsubscribe link.

021: How to Add A ConvertKit Opt-in Form To Facebook Page
In this video tutorial, I show you how you can collect leads on your Facebook page by connecting it wiht a ConvertKit opt-in Form. And in this way, give multiple opportunities to your viewers/readers to join your list!
Hello there!
Today on the ConvertKit Facebook page, Dave asked for an easy to set up a form on his facebook page:
I suggested I'd send him a video tutorial of how to set this up, so he has my video to follow in order to Make It Happen!
So here's the video:
I hope this was easy to follow. Please let me know your comments or questions below on this video or any other ConvertKit related question so I can make more video tutorials for you!
Peace,
Sophia
020: How to Use Clickable Buttons in Your ConvertKit Emails
Let's say you want to have your readers click a button in your ConvertKit emails that goes to a page on your website. This could be for really anything - link to blog post, link to a sales page, link to a video on YouTube - really any link. Let me show you how to set this up!
Let's say you want to have your readers click a button in your ConvertKit emails that goes to a page on your website. This could be for really anything - link to blog post, link to a sales page, link to a video on YouTube - really any link.
Your ConvertKit emails are set up so that you can use buttons as long as you use the Modern or Classic templates or create your very own template from scratch. Plus, the buttons can be used both in your broadcast emails as well as sequences emails.
Watch the video below to see how I set them up and scroll down below in this post to grab the code that you will need to use.
Step 1: Set up Modern or Classic as your default template OR Create your own custom template from scratch if you'd like to customize how the button looks.
Step 2: Customize how your button looks in your custom template.
You can change the colors for example or the button or the color of the text itself.
to change the button background:
background: #ffbc42;
Change the #ffbc42 (yellow) to a color of your choice
to add a border:
border: 2px solid #A09D87;
Change the #A09D87 (grey) to a color of your choice
to increase or decrease the spacing of the text:
letter-spacing: 3px;
to increase or decrease the font-size of the text:
font-size: 15px;
If your want to pick a color from a webpage, download this free app for Chrome/Firefox: http://www.colorzilla.com/
Step 3: Go inside your sequence email or your broadcast email and input this piece of code where you want the button to show up.
<a href="https://www.sophiaojha.com/live" class="button">Sign up to my next Live Training!</a>
Step 4: Add the link that you want your button to link to
Step 5: Change the text that you want the button to show.
Step 6: Every time you need to use the button, just use the code snippet again.
That's it!
So, that's another little step on how you can use ConvertKit the way you want to connect with your audience!
Do let me know if this was useful and what else you'd like to learn about ConvertKit or email marketing! Just drop a note in the comments below.
Peace,
Sophia
019: How to Link Your Pinterest Image with a ConvertKit Landing Page
Today I will show you in a quick video how to link your pinterest image to a landing page you have on Convertkit.
Hey there my friend,
Today I will show you in a quick video how to link your pinterest image to a landing page you have on Convertkit. This could be a stand-alone Convertkit Landing page or it could be a page that you've already connected on your site. All you need is to get the URL of that page for setting this up. Take a look at the video that shows you how to do this.
Do let me know if you have any follow-up questions which you can post in the comments below. If you have another question that you'd like a tutorial on, just go to the footer of the page and look for a Free Tutorial Request button. Then type away your query and I'll be happy to make a video tutorial for you!
Peace,
Sophia

018: How to Change "Unsubscribe" into German or other languages in your ConvertKit Emails
This video tutorial is specifically for you if you are writing your emails in a language other than English.
Yes, a lot of your readers may be bilingual or multi-lingual and may understand what it means when you write "unsubscribe". But let's say everything you write is in Dutch or French, then to have this one lone English word in the footer of your emails, just stands out unnecessarily.
Hello my multi-lingual friends,
This video tutorial is specifically for you if you are writing your emails in a language other than English.
Yes, a lot of your readers may be bilingual or multi-lingual and may understand what it means when you write "unsubscribe". But let's say everything you write is in Dutch or French, then to have this one lone English word in the footer of your emails, just stands out unnecessarily.
So, right now, you may have the foot of your emails looking like this:

But what if your audience is German speaking. And you want to just make it easy and familiar to them when they want to unsubscribe. You may want your email footer to look like this:

So then how to add "abmelden" instead of "unsubscribe" in the footer?
Follow the steps in my super short video which will make it simple as...
A B C. It's easy as, 1 2 3. As simple as, do re mi... well, you get the idea! Yes, I am a MJ fan ;)
Al'right, watch the video for the quick steps:
So, I hope that was super easy to follow. Please let me know what language you changed your unsubscribe link to and what it translates to in your language! Plus, if you have a question you'd like me to make video tutorial on, just drop it in the comments. I will add that to my list of blog ideas - probably to the top of my list if I know it's a burning question you have. (I want to make tutorials that solve a real problem - not something I think you may need. So please take advantage of this).
Also, if you'd like me to email you a link of that tutorial when it is done, then please make a free tutorial request using the button in the footer of this website. You can drop in your question there.
Thanks again for watching! Good luck in your Convertkit + blogging adventures! :)
Peace and harmony to you,
Sophia

017: How to Set Up a ConvertKit Pop-up Form or Exit Intent Form on Your Squarespace Site
This one is easy peasy and you'll be done in about 5 minutes - well, at least this video is less than 5 minutes. In it I show you, step by step, how to set up an exit intent form or a pop-up form on your Squarespace site.
This one is easy peasy and you'll be done in about 5 minutes - well, at least this video is less than 5 minutes. In it I show you, step by step, how to set up an exit intent form or a pop-up form on your Squarespace site.
Watch the Video below
Check the Display Settings
One thing that I didn't mention in the video is that because of new regulations from Google on pop-up forms for mobile, just make sure that you select "desktop only". Take a look at the screenshot below:

Well, my friend, I hope that you now can easily set up a pop-up form or exit intent form on your squarespace site using ConvertKit!
If you tried my steps, drop in your website link in the comments as I'd love to see what you have created.
Peace,
Sophia

Jessica Nichols - Photographer and Writer
She is a radiant, warm, smart, technically savvy woman with wonderful energy! Hiring her saved me hours of watching/reading tutorials.
I'm so grateful for this lovely testimonial from Jessica. It makes doing my work even more sweeter.

Sophia was so friendly and helpful and it turns out she helps people with their migrations! She has a very robust line of offers, but I like to do things in small bits and Sophia was so flexible. I completely trusted her with my credentials. She was very professional and did the migration very quickly.
We met on Skype where she gave me a guided tour of ConvertKit. She went above and beyond by setting up a template with my logo on it too. When I’m ready to do more advanced things, I will definitely turn to Sophia for help.
She is a radiant, warm, smart, technically savvy woman with wonderful energy! Hiring her saved me hours of watching/reading tutorials.
Jessica Nichols, Photographer and Writer at www.jessicanicholsart.com

016: How to Change Unsubscribe Link Color in ConvertKit
Alright, my friend! You know how to change the link color in your emails in ConvertKit (partly because you saw this quick tutorial: How to Change the Color of Your Links in Your ConvertKit Emails). But that was for the email content. What about changing the color of your unsubscribe link that's sitting at the bottom of your emails?

Alright, my friend! You know how to change the link color in your emails in ConvertKit (partly because you saw this quick tutorial: How to Change the Color of Your Links in Your ConvertKit Emails). But that was for the email content. What about changing the color of your unsubscribe link that's sitting at the bottom of your emails?
There are two steps involved here and the both involve code. But no worries, follow my steps and you will be able to accomplish this easily. Afterall, you do want that customize look for your unsub link right? ;-) Believe me, it's worth it and you know what you may fall in love with code - it's magic!!
So go ahead open your custom template and start plugging these codes.
Note: You will first need to create a custom template in ConvertKit. The following steps are applied inside the custom template. I have another video tutorial where I show you how to add social media links in your emails - and in that video (Video 002), the first part shows you how to create a custom template. So watch that video first and then follow the steps below.
Step 1: Add this code under style section of your custom template.
a.unsubscribe-link { color: #16bbb3; }
Note: #16bbb3 is a green teal color. Put in the hex code that you want here. Don't know what the hex code for your color is? Go to this free tool and look for your color hex code: color-hex.com.
Step 2: Add code in the Footer section of the custom template.
class="unsubscribe-link"
Add this piece of code ( class="unsubscribe-link") in the footer section at the very end of the template.
Where exactly to place it? Look for the following bit of code in the footer of the template.
<div class='message-content'>
{{ message_content }}
<div class="footer">
<a href="{{ unsubscribe_url }}" Unsubscribe</a> | {{ address }} </div>
</div>
So it should now look like this:
<div class='message-content'>
{{ message_content }} <div class="footer">
<a href="{{ unsubscribe_url }}" class="unsubscribe-link">Unsubscribe</a> | {{ address }}
</div>
</div>
Then place this code : class="unsubscribe-link" right before >Unsubscribe</a> | {{ address }}.
Watch video to see how quickly you can set this up. You will also understand clearly where the right spot is to place the code in the template by watching the video.
So, hope that you now can easily change the link unsubscribe link color in your ConvertKit emails!
If you tried my steps, write me a note in the comments to share how it turned out!
Peace,
Sophia

015: Four Key Pieces of A Successful Online Business
Last December, I sat down and made plans for the new year. One of my goals this year is to focus on building my list.
This really is key in any business because your email list is made of a group of people who are really interested in what you are teaching and they are trusting you to help solve their real problems.
In my biz, I not only show folks how to use ConvertKit to automate the different parts of their business but I am also showing how to monetize their activities online. And so building a list is at the core of a income-generating, profitable business. And who doesn't want to see money rolling in as a result of their online activities, right?
So if we zoom in further into that goal (of building a list), we find that there is another important component at play ---> and that's increasing traffic to your site.
(Click the video below where you can hear me read this post!)
1. Increasing Traffic To Your Website
Increasing traffic basically is about getting your website in front of an increasing number of people and more importantly, in front of the relevant people for whom your content, your products and your website as a whole will be useful.
There are two ways to increase traffic to your site. One is using paid advertisement such as placing ads on social media platforms (Facebook, YouTube, Pinterest, etc). The other is using free options that can be equally if not at times even more effective in the long-term. Both are legitimate ways of getting your website to be seen by your target audience.
Which one do I like? The latter - the free route.
2 Reasons Why I Love Free Means of Increasing traffic
Why do I love free traffic? For two reasons:
1. For new bloggers or online entrepreneurs who are not yet generating a sizable income/profit from their online activities, the idea of spending money on ads can be daunting. Yes, ads will bring in quick results. But if you are on a learning curve in that area as well (how to use ads effectively), then that whole route can turn costly. One may invest in ads but end up paying a price for experimentation. Plus, the results may vary.
2. Free traffic seems within reach. With your own efforts on the free traffic route you can grow your list - may be slightly slower than with paid traffic. But there is a wonderful thing about this process. You will see the growth of your list over a period of time - time that will also allow you to build the other pillars of your business which will make that list (folks on that list) stay with you longer and convert into customers better.
So now after having a facebook page and a youtube channel, I've finally joined the bandwagon! I am on Pinterest starting Feb 13th, 2017! Pinterest has had so many rave reviews as serving as a huge referrer for traffic that I cannot ignore it! As the year goes on, I'll share my findings and show you how I use it to grow my business.
There are many other free traffic generating avenues such as webinars with partners in your field, something I am very much interested in exploring this year.
2. Give Valuable Content
What good does it do if you create all this massive traffic to your site but there's nothing for those folks to stick around for. That's why creating good, useful content is fundamental to making your online biz rock n' roll.
Of course, this is not an easy thing. Most bloggers aim to blog once a week (according to a recent study), but barely accomplish that goal. And I get it. With running the many pieces of a business, and if you are a householder, then balancing that with running a home can be very challenging. On top of that you may be working on other personal goals like staying fit and eating healthy. It all eats up on your time.
When the one week mark comes along, we end up creating something just for the sake of publishing - for the sake of keeping our commitment of releasing weekly content. I completely fell for that in my last business where meeting that weekly deadline became more important than creating really good content.
That's why I don't recommend that you make blogging every week your goal. Surprised? It is surprising in the light that I am advocating having valuable content on your site.
What I recommend instead is this:
Make it your goal to create valuable content that is useful for your audience. And make it your goal to commit a half hour or an hour everyday.
I have just begun doing that and it works like magic. The idea here is that we focus on what actions will support us in achieving the end goal. So in my case, my goal is to create valuable content for my audience. And what supports that goal is to invest about an hour a day towards that. So I focus now on making sure that I get that hour in every single day.
This is the way, I can make sure that my blog is constantly growing as a resource for online entrepreneurs wanting to monetize their blog and build an impactful business. Otherwise client projects, daily administrative tasks, and all the other items on my to-do list will overtake my worklife!
3. Create Opt-in Opportunities
Once step 1 and 2 are doing their job, meaning you are increasing your traffic and you have valuable content on your site, you gotta make sure that Step 3 is ready. And Step 3 is all about having multiple opportunities on your site for your visitor/your target audience to join your list.
In fact, this Step 3 could actually be Step 1. Think of it this way. Let's say you are having some friends over for dinner. You know that they will be coming over on Friday evening. In our analogy, your friends are your target audience (1. Create Traffic). Say you've planned to prepare a nice risotto dish. That's the valuable content you are offering (2. Create Valuable Content). But for some reason, there are no doors in this house. Yep, in this crazy example, the house has no doors.
So your confused friends are outside your house. They can even smell the nice delicious risotto. But there is no way for them to get into the house.
I know it's a far-fetched analogy - which house does not have doors?? Thankfully, I do not know of any. But you see what I mean, right?
Create several doorways into your home
The doors in this analogy are the entry ways for your friends to come inside you house so they can try the mouth-watering deliciousness that you've promised them. (It must be lunch time as I am getting really hungry writing this!).
So make Step 3 an important piece of your website strategy. Create opt-ins for your visitor to join your list. Now make sure it is not the plain old "join my newsletter" - because that is not very high-converting. (In other blogs, I will show you some example of really good opt-ins). And then make sure it is not hidden on some obscure page - make it really present everywhere on your site (in your sidebar, in the navigation, at the end of your blog post, in the footer of your site, etc)
4. Create a mini-product
One big mistake I made in my last business is to create a very large full-blown flagship online course. It had 6 video modules with about 45 videos - all shot outdoors in beautiful waterfall setting. It took me a year and half to complete and lots of $$$ in equipment and time. And I did that before I had a big list of interested and engaged audience. Learning lesson, indeed!
So, that's why in this new business, I am focussing on serving my clients, creating useful content, increasing traffic to my site and building my list. After a bit of exposure to the problems that online entrepreneurs are facing, I will embark on creating a small digital product. It may be an ebook, video training, coaching program or an online course.
I don't know what it will be exactly but it will be something small. Something that I can quickly create, test it out to see if it is wanted in the marketplace and then go about creating an extended version for it.
So that's what I recommend to you: Create a Mini-Product!
So here is how I break it down:
Step 1.Create Traffic
Step 2. Create Valuable Content
Step 3. Create Opt-in Opportunities
Step 4. Create A Mini-Product
So there you have it - my four main areas that I recommend any new blogger to focus on. If you get this into your daily routine and rhythm, you will make great progress, my friend!
Takeaway: Now take a look at your own business. Which of the four areas could you work on? Can you dedicate an hour a day for that category? Try it. Do it for a week and see how the momentum is created. Share in the comments what challenge you are facing in growing your business and how you plan of resolving it.
I hope this has been helpful. I wish you good luck in moving forward in pursuing your dreams. Keep taking the right action and let's make it happen!
Peace,
Sophia

014: How to Connect Your Squarespace Website with Pinterest
If you have a website on Squarespace and want to connect it with your Pinterest Business account, then this video will show you how to do it in less than 2 minutes! Enjoy.
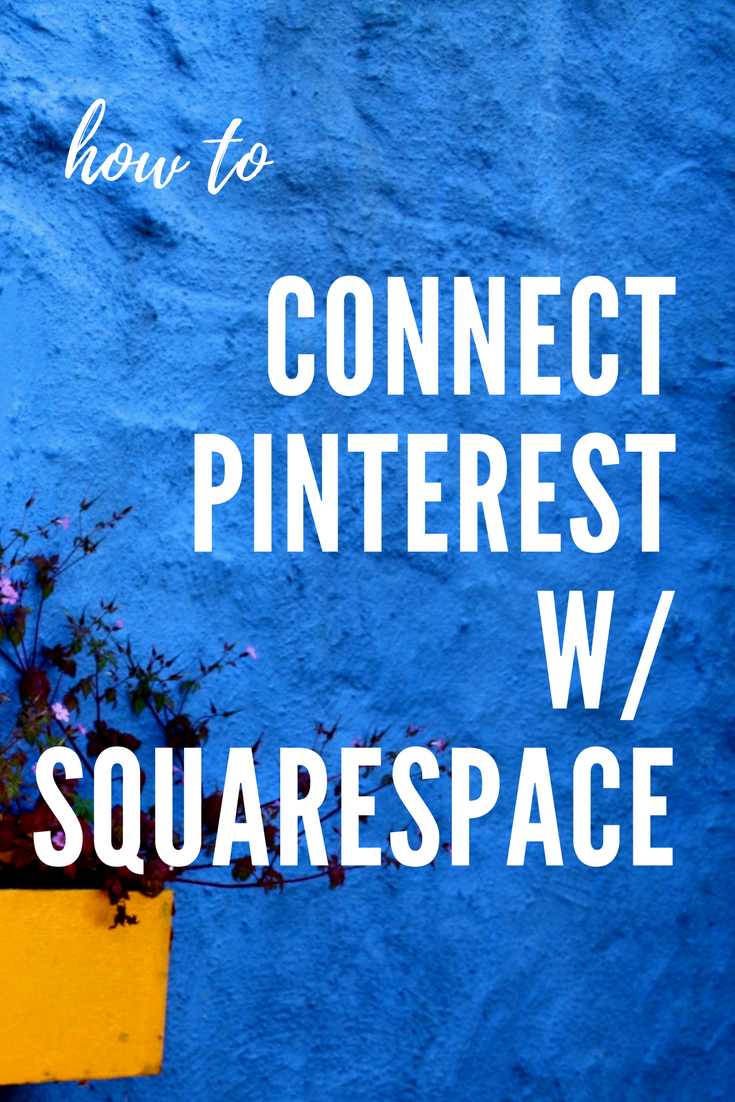
If you have a website on Squarespace and want to connect it with your Pinterest Business account, then this video will show you how to do it in less than 2 minutes! Enjoy.

013: ClickFunnels Integration with ConvertKit (Step 4 of 4)
Final Step!! Yay!! This is Step 4 of integrating ConvertKit with ClickFunnels.
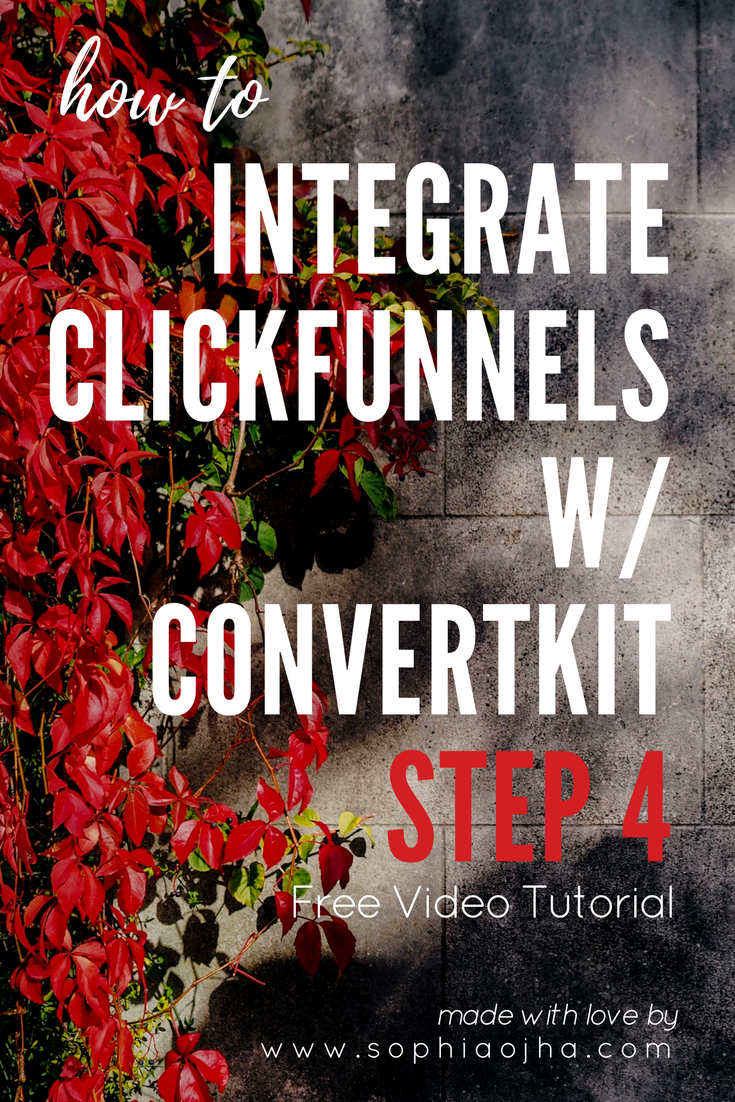
Final Step!! Yay!! This is Step 4 of integrating ConvertKit with ClickFunnels.
We covered Step 1 here and Step 2 here. And Step 3 is here.
(If you are using ClickFunnels to host your landing page or opt-in pages or webinar registration page, you can follow along these four videos and set up everything. What this will do is send the information about all the subscribers into your ConvertKit account.)
There are four steps involved in this.
Video 010: Step 1 - Prep CK account Try ConvertKit 30 days for free*
Video 011: Step 2 - Prep CF account Try ClickFunnels 14 days for free*
Video 012: Step 3 - Integrate CK with CF
Video 013: Step 4 - Test it all out
* These are affiliate links. I highly recommend these tools as I find them very useful myself.
Now on to Step 4 Testing the integration of ConvertKit with your ClickFunnels Account: